10 thủ thuật tối ưu tốc độ ứng dụng Angular


Bài viết này mình đã sưu tầm một số thủ thuật tăng tốc độ ứng dụng Angular. Mình cũng tham khảo tại đây Angular Performance Checklist
1. ChangeDetectionStrategy.OnPush
Change dectection là một trong những tính năng quan trọng nhất trong JS và framework của nó. Đây là khả năng nhận ra thay đổi khi người dùng thay đổi dữ liệu hoặc các chỉnh sửa sau đó và cập nhật lại DOM để cập nhật giao diện.
Angular sử dụng Zone.js để xử lý sự kiện bất đồng bộ, mỗi khi có bất cứ sự kiện nào xảy ra thì Angular sẽ chạy cơ chế change detection thông qua Component tree.
Sẽ rất dễ để bạn bị lỗi performance nếu Change Detection (CD) chạy khi dữ liệu không deeply changed nhưng tham chiếu thì bị thay đổi. Thế là thế nào? Deeply changed là gì?
Các component có các input mà chúng sử dụng để nhận dữ liệu từ form. Khi các sự kiện bất đồng bộ xảy ra, Angular sẽ chuyển thành component tree (dạng cấu trúc dữ liệu cây các component theo dạng cha con) và kiểm tra các input có sự khác nhau so với giá trị trước đó không. Việc này được thực hiện bởi các toán tử so sánh. Toán tử này kiểm tra tham chiếu thay đổi trong component input và một ô nhớ mới sẽ được cấp phát cho giá trị mới.
Angular đưa ra 2 chiến lược cho Change Detection: Default và OnPush.
OnPush là mode sẽ vô hiệu hóa CD chạy trên một component và các component con của nó. Khi ứng dụng bắt đầu chạy, Angular chạy CD trên OnPush component và vô hiệu hóa nó. Lần CD chạy tiếp theo, OnPush component sẽ bị bỏ quá cùng với các component con của nó trong tree.
CD chỉ chạy các OnPush component chỉ khi nếu các input có sự thay đổi về tham chiếu.
2. Detaching the Change Detector
Every component in an Angular project tree has a change detector. We can inject this change detector (ChangeDetectorRef) to either detach the component from the CD tree or attach it to the CD tree. So, when Angular run CD on the component tree, the component with its sub-tree will be skipped.
Tất cả các component trong một project Angular đều có cơ chế tìm sự thay đổi (change detector). Chúng ta có thể inject change detector (ChangeDetectorRef) để detach component ra khỏi CD tree hoặc attach nó vào CD tree. Vì vậy, khi Angular chạy CD trên component tree, component với sub-tree của nó sẽ bị bỏ qua.
Điều này được giải quyết bằng cách sử dụng class ChangeDetectorRef.
export abstract class ChangeDetectorRef {
  abstract markForCheck(): void;
  abstract detach(): void;
  abstract detectChanges(): void;
  abstract checkNoChanges(): void;
  abstract reattach(): void;
}
Xem xét các phương thức:
markForCheck: Khi một view sử dụng OnPush strategy, nó sẽ đánh dấu view bị thay dổi và nó có thể được kiểm tra lại. Các component thông thường được đánh dấu là dirty khi các input bị thay đổi hoặc các sự kiện được trigger trên view. Gọi phương thức này để đảm bảo là một component được kiểm tra ngay cả khi nếu các trigger không xảy ra.
detach: Detaches this view from the change-detection tree. A detached view is not checked until it is reattached. Use in combination with detectChanges() to implement local change detection checks. Detached views are not checked during change detection runs until they are re-attached, even if they are marked as dirty. detach
detectChanges: Checks this view and its children. Use in combination with detach to implement local change detection checks.
checkNoChanges: Checks the change detector and its children, and throws if any changes are detected. Use in development mode to verify that running change detection doesn’t introduce other changes.
reattach: Re-attaches the previously detached view to the change detection tree. Views are attached to the tree by default.
Example, we have this component:
@Compoennt({
    ...
})
class TestComponent {
    constructor(private changeDetectorRef: ChangeDetectorRef) {
        chnageDetectorRef.detach()
    }
}
We called the detach from the constructor because that’s the initialization point so the component is detached from the component tree at startup. CD runs on the entire component tree won’t affect TestComponent. If we change a template-bound data in the component, we need to reattach the component, so the DOM is updated on the next CD run.
This does that:
@Component({
    ...
    template: `<div>{{data}}</div>`
})
class TestComponent {
    data = 0
    constructor(private changeDetectorRef: ChangeDetectorRef) {
        changeDetectorRef.detach()
    }
    clickHandler() {
        changeDetectorRef.reattach()
        data ++
    }
}
3. Local Change Detection
With the detaching of components we saw above, we can now work with it to trigger CD from our component, which will run down the component sub-tree.
With the TestComponent like below:
@Component({
    ...
    template: `<div>{{data}}</div>`
})
class TestComponent {
    data = 0
    constructor(private changeDetectorRef: ChangeDetectorRef) {
        changeDetectorRef.detach()
    }
}
We can update the data-bound data property and use detectChanges method to run CD only for the TestComponent and its children.
@Component({
    ...
    template: `<div>{{data}}</div>`
})
class TestComponent {
    data = 0
    constructor(private changeDetectorRef: ChangeDetectorRef) {
        changeDetectorRef.detach()
    }
    clickHandler() {
        data ++
        chnageDetectorRef.detectChnages()
    }
}
The clickHandler method will increase the data value by one and call detectChanges to run CD on the TestComponent and its children. This will cause the data to be updated on the DOM while still being detached from the CD tree.
Local CD is run from the component down to its children, unlike the global CD that runs from the root up to the children.
This will be a huge performance if the data variable updates every second.
4. Run outside Angular
We know that NgZone/Zone is what Angular uses to tap into async events to know when to run CD on the component tree. With that, all code we write on Angular runs on the Angular zone, this zone is created by Zone.js to listen on async events and tell them to Angular.
Angular has this feature that enables us to run code units outside this Angular zone. Now, in this outside-Angular zone, async events are no longer picked up by NgZone/Zone, so any async event emitted no CD is run for it. This means that the UI will not be updated.
This is very useful if we are running a code that upsets the UI every second. You will see that it is optimal to leave out updating the UI first, then wait till when you want to display the data you re-enter ng Zone.
@Component({
    ...
    template: `
        <div>
            {{data}}
            {{done}}
        </div>
    `
})
class TestComponent {
    data = 0
    done
    constructor(private ngZone: NgZone) {}
    processInsideZone() {
        if(data >= 100)
            done = "Done"
        else
            data += 1
    }
    processOutsideZone() {
        this.ngZone.runOutsideAngular(()=> {
            if(data >= 100)
                this.ngZone.run(()=> {data = "Done"})
            else
                data += 1
        })
    }
}
processInsideZone runs the code inside the Angular, so the UI is updated when the method is run.
processOutsideZone runs the code outside the ng Zone, so the UI is not updated. We want to update the UI to show “Done” when the data is equal or past 100, we re-enter ngZone and set the data to “Done”.
5. Use pure pipes
Pure pipes introduce no side-effects so the behavior is predictable and we can cache the input to shortcut CPU-intensive operations to avoid recomputing them.
Just imagine we have a function in a @Pipe that takes a good deal amount of time before producing a result.
function bigFunction(val) {
    ...
    return something
}
@Pipe({
    name: "util"
})
class UtilPipe implements PipeTransform {
    transform(value) {
        return bigFunction(value)
    }
}
We will see that this function will hang the main thread which runs the UI and will make it laggy for the users. To make it worse, the pipe is called every second that will be one hell of an experience for the users.
To reduce the number times this pipe is called, we have to note first the behavior of the pipe, if it does not change data outside its scope (outside the pipe), ie the pipe is a pure function. We cache the results and return them when next the same input occurs.
So no matter how many times the pipe is called with an input, the bigFunction is called once and the cached results are just returned on subsequent calls.
To add this behavior, we need to set the pure flag in the @Pipe decorator object literal argument to true.
function bigFunction(val) {
    ...
    return something
}
@Pipe({
    name: "util",
    pure: true
})
class UtilPipe implements PipeTransform {
    transform(value) {
        return bigFunction(value)
    }
}
With this, we tell Angular that this pipe is pure and doesn’t side-effect, so it should cache the outputs and return them when the inputs occur again.
We see that with this, for any inputs the bigFunction is computed once and cached, subsequent calls with the same inputs will skip recomputing the bigFunction and return the cached results.
6. Use trackBy option for *ngFor directive
*ngFor is used for repeating over iterables and rendering them on the DOM. Though, very useful it comes with its performance bottleneck.
Internally, ngFor uses the differs to know when there is a change in the iterable, so it can re-render. the differs uses the strict reference operator === for this, which looks at objects references (ie memory address).
Couple this with the immutability practice, we will see that we will break objects references which will cause the ngFor to continually destroy and re-create the DOM on each iterable.
This will not be an issue for 10- 100 elements in an iterable, but going to 1000 — ~, that will seriously impact the UI thread.
ngFor has an option, trackBy (or I would say its an option for the Differs) that it uses to track elements identity in an iterable.
This will cause it to enable the dev state his identity in the iterable for the Differ to track. This will prevent the whole DOM from being constantly destroyed and re-created.
7. Optimize template expressions
Template expressions are the most common thing we do in Angular.
We often run functions in templates:
@Component({
    template: `
        <div>
            {{func()}}
        </div>
    `
})
class TestComponent {
    func() {
        ...
    }
}
Now, this func will be run when CD is run on the TestComponent. Also, this func will have to complete before the CD and other codes will move on.
If the func takes a long time to finish, it will result in a slow and laggy UI experience for the users because the func will have to finish before other UI codes will be run. We see that template expressions must finish quickly, if a template expression becomes highly-computational, then caching should be employed on it.
8. Web Workers
JS is a single-threaded language, this means that JS code is run on the main thread. This main thread runs algorithms and the UI algorithm.
Now, if the non-UI algorithm gets heavy we will see that it will impact the UI thread slowing it down. Web Worker is a feature added that enables us to create and run code in another thread. Yes, another thread
Using a self-plagiarism from my previous article Angular Performance: Web Worker :
using Web Workers in Angular, its setup, compiling, bundling and code-splitting were made easy by the CLI tool.
To generate a Web Worker, we run the ng g web-worker command:
ng g web-worker webworker
This will generate webworker.ts file in the src/app of an Angular app. The web-worker tells the CLI tools that the file would be used by a Worker.
To demonstrate how to use Web worker in Angular to optimize its performance. Let’s say we have an app that calculates Fibonacci numbers. Finding Fibonacci numbers in the DOM thread will kinda impact the UI experience because the DOM and the user interactions would freeze until the number is found.
Starting, our app would be like this:
// webWorker-demo/src/app/app.component.ts
@Component({
    selector: 'app',
    template: `
        <div>
            <input type="number" [(ngModel)]="number" placeholder="Enter any number" />
            <button (click)="calcFib">Calc. Fib</button>
        </div>
        <div>{{output}}</div>
    `
})
export class App {
    private number
    private output
    calcFib() {
        this.output =fibonacci(this.number)
    }
}
function fibonacci(num) {
    if (num == 1 || num == 2) {
        return 1
    }
    return fibonacci(num - 1) + fibonacci(num - 2)
}
Calculating Fibonacci numbers is recursive, passing small numbers like 0–900 would have no performance impact. Imagine passing ~10,000. That’s when we will begin to notice performance drag. Like we said the best bet is to move the fibonacci function or algorithm to execute in another thread. So no matter how large the number is, it will not be felt in the DOM thread.
So we scaffold a Web Worker file:
ng g web-worker webWorker
and move the fibonacci function into the file:
// webWorker-demo/src/app/webWorker.ts
function fibonacci(num) {
    if (num == 1 || num == 2) {
        return 1
    }
    return fibonacci(num - 1) + fibonacci(num - 2)
}
self.addEventListener('message', (evt) => {
    const num = evt.data
    postMessage(fibonacci(num))
})
Now we will edit the app.component.ts to add Web Worker
// webWorker-demo/arc/app/app.component.ts
@Component({
    selector: 'app',
    template: `
        <div>
            <input type="number" [(ngModel)]="number" placeholder="Enter any number" />
            <button (click)="calcFib">Calc. Fib</button>
        </div>
        <div>{{output}}</div>
    `
})
export class App implements OnInit{
    private number
    private output
    private webworker: Worker
    ngOnInit() {
        if(typeof Worker !== 'undefined') {
            this.webWorker = new Worker('./webWorker')
            this.webWorker.onmessage = function(data) {
                this.output = data
            }
        }
    }
    calcFib() {
        this.webWorker.postMessage(this.number)
    }
}
Our code is now kiss emoji here We added ngOnInit lifecycle hook in our component so to initialize the Web Worker with the Web Worker file we generated earlier. We registered to listen to messages sent fro the Web Worker in the onmessagehandler any data we get we will display it in the DOM.
We made the calcFib function to send the number to Web Worker. This below in webWorker would capture the number
self.addEventListener('message', (evt) => {
    const num = evt.data
    postMessage(fibonacci(num))
})
and processes the Fibonacci number then send the result back to the DOM thread. The onmessage we set up in the app.component
ngOnInit() {
        if(typeof Worker !== 'undefined') {
            this.webWorker = new Worker('./webWorker')
            this.webWorker.onmessage = function(data) {
                this.output = data
            }
        }
    }
would receive the result in data then we will display the result in the DOM using the {{output}} interpolation.
During the processing of the Fibonacci numbers, the DOM thread would be left focusing on the user interactions while the webWorker would do the heavy processing.
9. Lazy-Loading
Lazy-loading is one of the most popular and most effective optimization trick in the browser. It involves deferring the load of resources (images, audio, video, webpages) at load time till the time it’s needed then, it’s loaded.
This is very effective, it reduces the amount of bundled file that is loaded at the initial load of the webpage, and only loads the resources that will be used directly in the webpage. All other resources are not loaded. When they are needed by the user, the resources needed are then loaded.
Angular provides a very easy way for us to lazy-load resources. To lazy-load routes in Angular, we do this:
const routes: Routes = [
    {
        path: '',
        component: HomeComponent
    },
    {
        path: 'about',
        loadChildren: ()=> import("./about/about.module").then(m => m.AboutModule)
    },
    {
        path:'viewdetails',
        loadChildren: ()=> import("./viewdetails/viewdetails.module").then(m => m.ViewDetailsModule)
    }
]
@NgModule({
    exports: [RouterModule],
    imports: [RouterModule.forChild(routes)]
})
class AppRoutingModule {}
We use the dynamic import to tell Angular routes we want to lazy load. Angular will generate a separate chunk for about and viewdetails. On the initial load of the app, the about and viewdetails chunk is not loaded, when the user wants to navigate to about or viewdetails route, the specified chunk is then loaded.
If the size of the whole non-lazy-loaded bundle is 1MB. Lazy-loading will splice out the about and viewdetails from the 1MB, let’s say they are 300kb and 500kb respectively, we will see that the bundle will be cut down to 200kb more than half of the original size!!!
10. Preloading
This is an optimization strategy that loads resources (webpages, audio, video files) for faster future navigations or consumption. This speeds up both loading and rendering of the resource because the resource will already be present in the browser cache.
Angular has preloading strategy implemented in @angular/router module. This allows us to preload resources, routes/links, modules, etc in Angular apps. The Angular router provides an abstract class PreloadingStrategy that all class implements to add their preloading strategy in Angular.
class OurPreloadingStrategy implements PreloadingStrategy {
    preload(route: Route, fn: ()=> Observable <any>) {
        // ...
    }
}
We specify it as the value for the preloadingStrategy property in the router configuration.
// ...
RouterModule.forRoot([
    ...
], {
    preloadingStrategy: OurPreloadingStrategy
})
// ...
That’s it.
Conclusion
There goes the top 10 best practices for optimizing your Angular app.
These practices must not be all implemented in your Angular app, It’s just worth knowing each of them and knowing when to apply them.
Also, remember, don’t optimize early. Build the product and then, find out places to optimize.
If you have any questions regarding this or anything I should add, correct or remove, feel free to comment, email or DM me.
Thanks !!!
Trích nguồn từ: https://blog.bitsrc.io/10-tricks-to-optimize-your-angular-app-44208f616bf0
Tags:
Bài viết liên quan
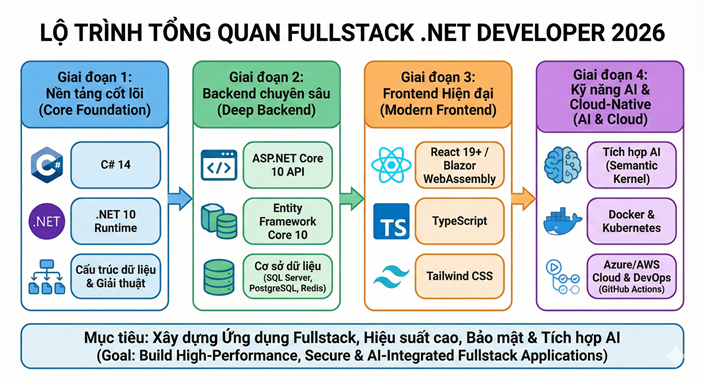
Lộ trình Fullstack .NET Developer 2026
Chào bạn, bước sang năm 2026, lộ trình của một Fullstack .NET Developer đã có những thay đổi quan trọng để thích nghi với sự lên ngôi của AI, điện toán đám mây và phiên bản .NET 10 (LTS) vừa ra mắt cuối năm 2025.
Đọc thêm
TỔNG QUAN LÝ THUYẾT & THÀNH PHẦN CỐT LÕI SYSTEM DESIGN
Các lý thuyết cốt lõi trong System Design
Đọc thêm
Cẩm nang Big-O: Thước đo hiệu năng thuật toán trong C#
Hiểu rõ Big-O từ O(1) đến O(n!) qua ví dụ C# thuần. Bí quyết tối ưu code, chọn đúng cấu trúc dữ liệu để hệ thống luôn chạy nhanh và ổn định.
Đọc thêm

Các mẫu thiết kế (design patterns) phổ biến trong kiến trúc Microservices.
Các mẫu thiết kế (design patterns) phổ biến trong kiến trúc Microservices.
Đọc thêm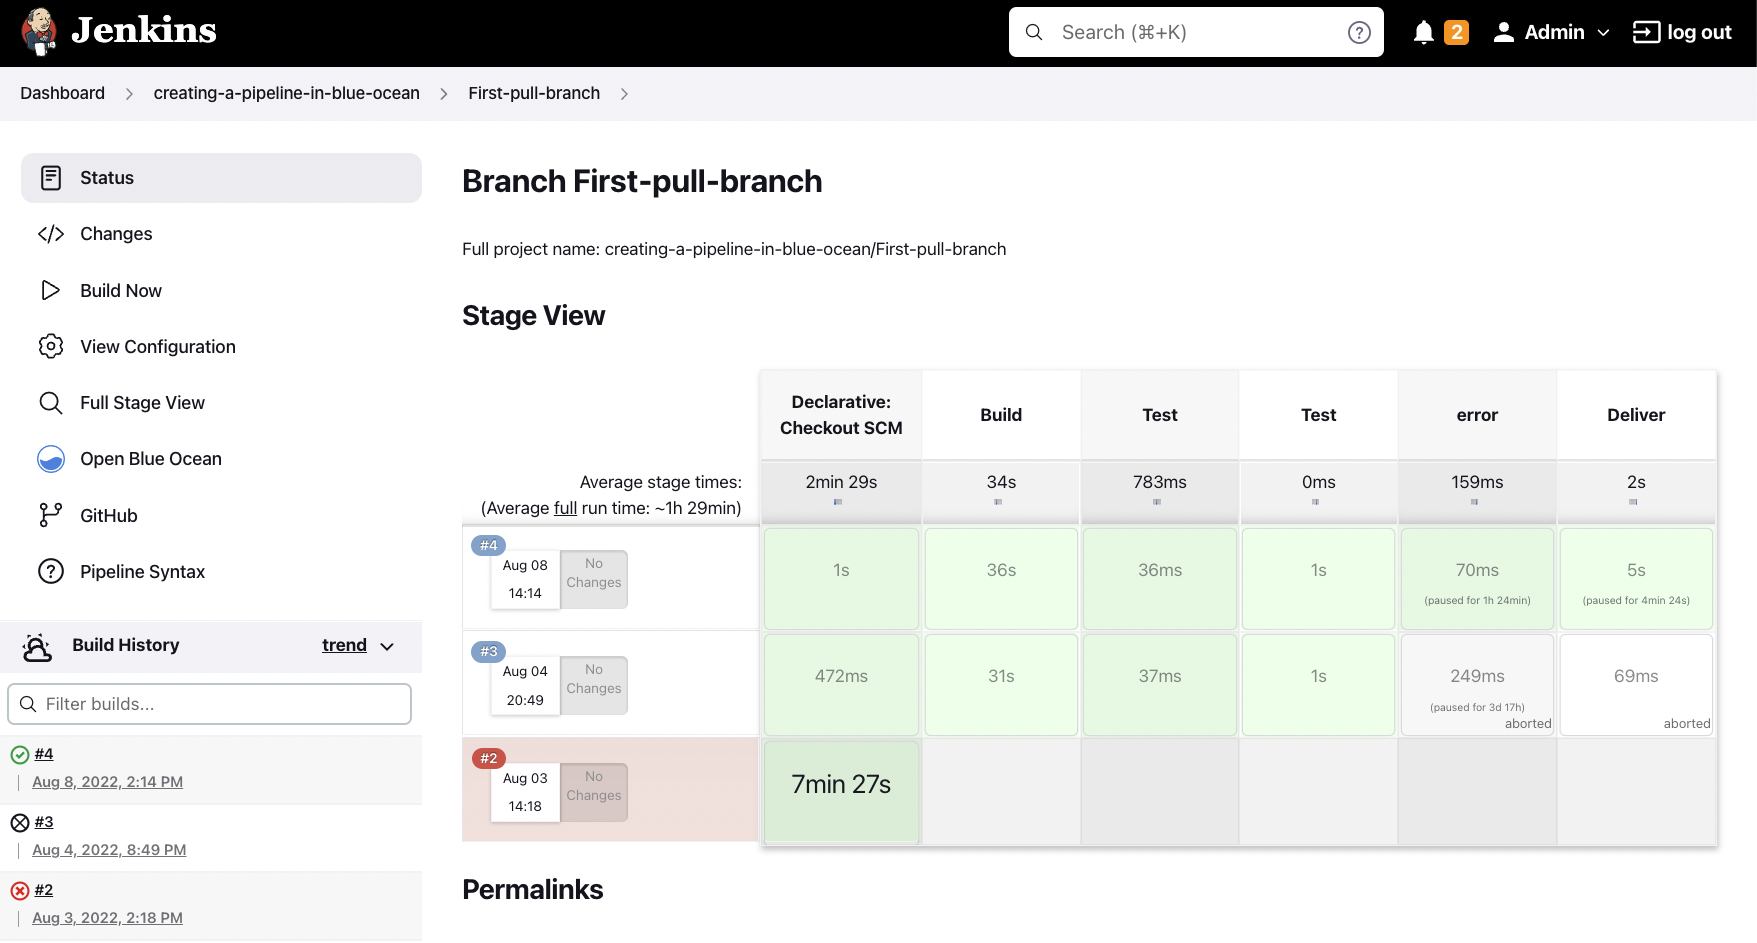
Hướng dẫn Bind Jenkins vào IIS trên Windows bằng Reverse Proxy
Cho phép truy cập Jenkins từ một subdomain (ví dụ jenkins.tedu.com.vn) thay vì phải gõ http://localhost:8080.
Đọc thêm
Hiểu về AI, LLM, RAG và Agentic RAG trong 15 phút
Trong vài năm gần đây, trí tuệ nhân tạo (AI) đã bùng nổ mạnh mẽ và trở thành tâm điểm của cả thế giới công nghệ. Nhưng đi kèm với nó là hàng loạt khái niệm mới như LLM, RAG, hay Agentic RAG khiến nhiều người mới bắt đầu cảm thấy lúng túng.
Đọc thêm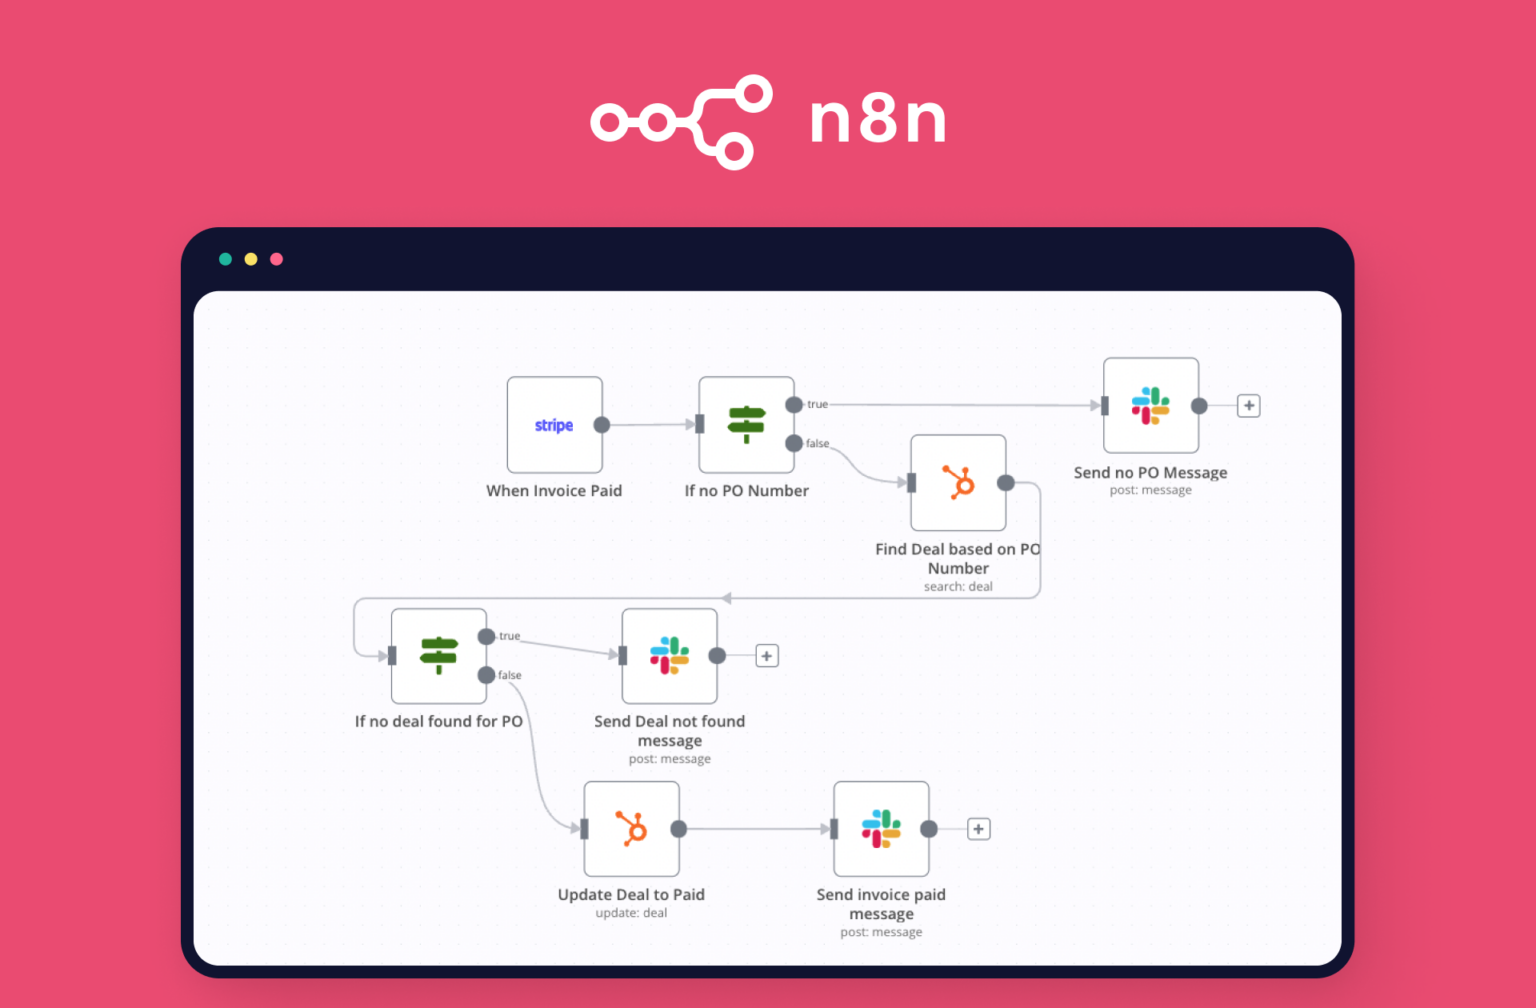
Hướng dẫn tự triển khai N8N trên CentOS bằng Docker Compose và NGINX
N8N là công cụ mã nguồn mở cho phép bạn tự động hóa quy trình làm việc (workflow automation) và tích hợp nhiều dịch vụ khác nhau mà không cần phải lập trình.
Đọc thêm
Hướng dẫn phân tích độ phức tạp thuật toán chi tiết
Độ phức tạp của giải thuật là một cách để đánh giá hiệu quả của một giải thuật dựa trên hai yếu tố chính là độ phức tạp thời gian và độ phức tạp không gian.
Đọc thêm
Bài 6. Các thao tác với XPath và Selector trong Selenium
Bài viết này hướng dẫn bạn làm việc XPath và Css Selector trong Selenium.
Đọc thêm