Cơ chế Dependency Injection trong ASP.NET Core

Dependency Injection giờ đã trở thành thành phần chính thức mặc định của ASP.NET Core. Nó giúp chúng ta đáp ứng tính chất lỏng lẻo (loosely couple), dễ đọc và bảo trì code. Trong bài viết này chúng ta sẽ học cơ bản về Dependency Injection trong việc xây dựng ứng dụng đơn giản.
Giới thiệu về Dependency Injection trong ASP.NET Core
Dependency Injection (DI) giờ là một phần của ASP.NET Core. Tất cả các service của framework đều được inject khi chúng ta c ần. Nhưng trước khi đi xa hơn, chúng ta cần hiểu tại sao cần dependency injection. Hãy xem ví dụ sau đây trong controller action method khi chúng ta muốn lấy danh sách sản phẩm ra từ ProductService.
public class HomeController : Controller
{
    public IActionResult Index()
    {
        _productService = new ProductService();
         return View(_productService.getAll());
    }
}
Action method Index có một phụ thuộc đến ProductService. Vì thế nó tạo ra một thể hiện và gọi phương thức phương thức GetAll để lấy danh sách sản phẩm. ProductService giờ đã bị gắn chặt (tightly couple) vào phương thức Index của HomeController.
Nếu chúng ta tạo BetterProductService và muốn thay thế ProductService cũ thì sao:
public IActionResult Index()
{
    _productService = new BetterProductService();
    return View(_productService.getAll());
}
Chúng ta cần làm điều đó với tất cả các Controller, service có sử dụng ProductService. Nếu chúng ta muốn sử dụng TestProductService và chỉ muốn dùng nó cho mục đích test còn với môi trường Production thì sẽ là ProductService. Vậy là không dễ dàng.
Hãy xem xét trường hợp khi ProductService phụ thuộc vào service khác, sau đó service đó lại phụ thuộc service khác nữa. Nó không thường xuyên nhưng việc một chuỗi các phụ thuộc như thế chắc chắn có tồn tại trong thực tế.
Depedency Injection sẽ giải quyết tất cả các vấn đề này.
Depedency Injection là gì?
Dependency Injection (được biệt là DI) là một design pattern khi một đối tượng không được tạo trong các thành phần phụ thuộc vào nó mà yêu cầu nó. Hãy thay đổi HomeController một chút:
public class HomeController : Controller
{
    private IProductService _productService;

    public HomeController(IProductService productService)
    {
        _productService = productService;
    }

    public IActionResult Index()
    {
        _productService = new ProductService();
        return View(_productService.All());
    }
}
Sự khác nhau giữa đoạn code trên và đoạn code này là chúng ta không tạo ra thể hiện của ProductService trong Index action method. Chúng ta yêu cầu nó trong constructor của HomeController. Vấn đề đã được giải quyết chưa? Ai đó đã tạo thể hiện của ProductService và gán nó vào HomeController?
Đây là điểm mà ASP.NET Core Dependency Injection framework làm nhiệm vụ của nó. Trách nhiệm của nó là tạo ra thể hiện của ProductService và đối tượng này được gọi là DI Container hay Ioc Container.
Dependency Injection là một design pattern. Dependency injection framework triển khai design pattern này. Có nhiều framework như Autofac, Unity...bạn có thể sử dụng trong ASP.NET Core.
DI Container
DI Container là một đối tượng có trách nhiệm tạo các phụ thuộc (ProductService) và gán nó cho đối tượng yêu cầu (HomeController) nó.
Làm thế nào DI Container biết đối tượng nào được tạo?
Chúng ta cần cấu hình cho DI Container là class nào bạn muốn tạo. Chúng ta cần đặt trong class Startup với phương thức ConfigureServices.
public void ConfigureServices(IServiceCollection services)
{
    services.AddMvc();
    services.AddTransient<IProductService, ProductService>();
}
Dòng thứ 2 sẽ đăng ký ProductService với service collection sử dụng phương thức AddTransient. Có 2 phương thức khác là AddSingleton và AddScoped. Có 3 phương thức định nghĩa vòng đời của service mà chúng ta sẽ thảo luận trong bài sau.
Ví dụ về hệ thống Dependency Injection
Tạo một project ASP.NET Core sử dụng empty template và đặt tên nó là DependencyInjection. Thêm HomeController với Index method. Bạn có thể tham khảo các bài viết trước.
Tạo ViewModel
Tạo một folder Models và tạo ViewModel như sau:
public class ProductViewModel
{
    public int Id { get; set; }
    public string Name { get; internal set; }
}
Thêm mới service
Tạo một thư mục Services và thêm mới một class với tên ProductService.cs
using DependencyInjection.Models;
using System.Collections.Generic;

namespace DependencyInjection.Service
{

    public interface IProductService
    {
        List<ProductViewModel> getAll();
    }

    public class ProductService : IProductService
    {
        public List<ProductViewModel> getAll()
        {
            return new List<ProductViewModel>
            {
                new ProductViewModel {Id = 1, Name = "Pen Drive" },
                new ProductViewModel {Id = 2, Name = "Memory Card" },
                new ProductViewModel {Id = 3, Name = "Mobile Phone" },
                new ProductViewModel {Id = 4, Name = "Tablet" },
                new ProductViewModel {Id = 5, Name = "Desktop PC" } ,
            };
        }
     }
}
Đầu tiên chúng ta thêm interface IProductService và thêm ProductService để triển khai interface này. ProductService sẽ trả về một danh sách sản phẩm. Danh sách sản phẩm được fix cứng trong code. Trong thực tế thì nó sẽ lấy từ database.
Sử dụng Service trong Controller
Giờ hãy mở HomeController
using DependencyInjection.Service;
using Microsoft.AspNetCore.Mvc;

namespace DependencyInjection.Controllers
{
    public class HomeController : Controller
    {
        private IProductService _productService;

        public HomeController(IProductService productService)
        {
            _productService = productService;
        }

        public IActionResult Index()
        {
            return View(_productService.getAll());
        }
    }
}
Constructor của HomeController yêu cầu một thể hiện của ProductService và lưu trữ nó trong biến local tên là _productService. Phương thức Index gọi view với danh sách sản phẩm được lấy ra từ phương thức GetAll của ProductService.
View
View chỉ hiển thị danh sách sản phẩm
@model List<DependencyInjection.Models.ProductViewModel>;

@{
    ViewData["Title"] = "Index";
}

<h2>Index</h2>

@foreach (var product in Model)
{
    <p>@product.Id @product.Name</p>
}
Đăng ký service
Bước cuối cùng là đăng ký service với Dependency Injection container. Mở Startup.cs và đến phương thức ConfigureServices. Nơi mà tất cả các service được cấu hình cho DI.
public void ConfigureServices(IServiceCollection services)
{
    services.AddMvc();
    services.AddTransient<IProductService, ProductService>();
}
Giờ chúng ta sẽ đăng ký ProductService sử dụng phương thức AddTransient. Có 2 phương thức khác là AddScoped và AddSingleton. Chúng ta sẽ tìm hiểu sau nhé. Giờ hãy chạy ứng dụng và nhìn kết quả.
Các thành phần phụ thuộc được inject như thế nào?
Hình dưới đây mô tả cách mà ProductService được inject vào HomeController
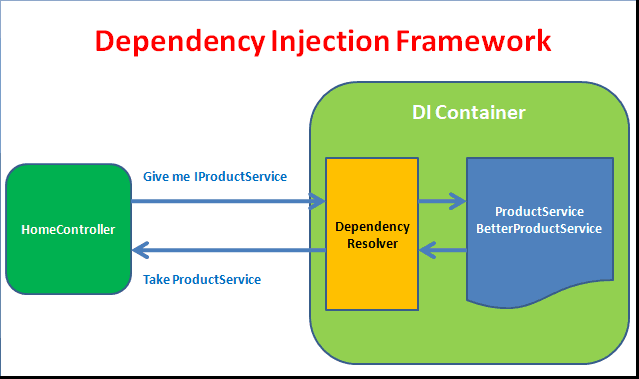
Khi một HomeController mới được yêu cầu, MVC sẽ yêu cầu DI framework cung cấp một thể hiện của HomeControlelr class. DI Container sẽ xem constructor của HomeController và xác định xem nó có những thành phần phụ thuộc nào (depedencies). Nó sẽ tìm các thành phần phụ thuộc trong danh sách được đăng ký của service collection và tìm service nào thoả mãn sau đó tạo thể hiện cho nó. Sau khi tạo HomeController và gán thể hiện của dependencies đó cho constructor.
Tạo BetterProductService
Giờ chúng ta sẽ tạo mới service khác là BetterProductService và muốn sử dụng nó thay vì ProductService
public class BetterProductService : IProductService
{
    public List<ProductViewModel> getAll()
    {
        return new List<ProductViewModel>
        {
            new ProductViewModel {Id = 1, Name = "Television" },
            new ProductViewModel {Id = 2, Name = "Refrigerator" },
            new ProductViewModel {Id = 3, Name = "IPhone" },
            new ProductViewModel {Id = 4, Name = "Laptop" },
        };
    }
}
Tất cả bạn cần làm là vào ConfigureServices trong Startup thay đổi ProductService thành BetterProductService.
public void ConfigureServices(IServiceCollection services)
{
    services.AddMvc();

    services.AddTransient<IProductService, BetterProductService>();
}
Bạn không phải vào mỗi controller hay service để thay đổi. Bạn có thể quản lý nó ở một nơi duy nhất. Tương tự bạn có thể làm với TestProductService sử dụng chúng để test.
Thay đổi Service dựa trên environment
Ví dụ, bạn có thể sử dụng môi trường và chuyển đổi giữa các service Trong constructor của Startup class yêu cầu IHostingEnvironment service:
IHostingEnvironment _env;
public Startup(IHostingEnvironment env)
{
    _env = env;
}
Tiếp theo trong ConfigureServices chúng ta cấu hình code với BetterProductService trong Production và ProductService cho các môi trường khác.
public void ConfigureServices(IServiceCollection services)
{
    services.AddMvc();

    if (_env.IsProduction())
    {
        services.AddTransient<IProductService, BetterProductService>();
    }
    else
    {
        services.AddTransient<IProductService, ProductService>();
    }
}
Thay đổi môi trường chọn Project, chuột phải và chọn Properties. Chọn tab Debug. Thay đổi ASPNETCORE_ENVIRONMENT thành môi trường gì mà bạn muốn.
Constructor Injection và Action Injection
Bạn có thể inject service vào Controller theo 2 cách:
- Constructor Injection
- Action Injection
Constructor Injection
Khi các thành phần được inject vào thông qua constructor sau đó cách này được gọi là constructor injection
public class HomeController : Controller
{

    private IProductService _productService;
    public HomeController(IProductService productService)
    {
        _productService = productService;
    }

    public IActionResult Index()
    {
        return View(_productService.All());
    }
}
Action Injection
Nếu các dependencies được inject qua một action method thì cách này gọi là Action Injection. Action Injection được thực hiện sử dụng [FromServices] attribute vào một tham số của action method. Sử dụng method này nếu service chỉ được sử dụng trong một action method thôi.
public class HomeController : Controller
{
    public HomeController()
    {
    }

    public IActionResult Index( [FromServices] IProductService productService)
    {
       return View(_productService.All());
    }
}
Lợi ích của Dependency Injection
- Dependency injection giúp thực hiện kiến trúc lỏng lẻo (loose coupling) trong phần mềm.
- Code sẽ sạch và dễ đọc hơn
- Tăng khả năng có thể kiểm thử và bảo trì
- Cho phép bạn thay đổi triển khai mà không phải thay đổi quá nhiều code.
Trích nguồn từ: https://www.tektutorialshub.com/
Tags:
Bài viết liên quan

dotnet watch run và Hot Reload: Sửa Code .NET Không Cần Restart App
Hướng dẫn cài dotnet watch và Razor Runtime Compilation để sửa file .cshtml tự reload, sửa C# bấm Ctrl+R — từng bước, chạy được ngay
Đọc thêm
Phân biệt IOptions, IOptionsSnapshot và IOptionsMonitor trong ASP.NET Core: Hướng dẫn chi tiết
hi làm việc với Options Pattern trong ASP.NET Core, việc map (ánh xạ) file appsettings.json sang class C# chỉ là bước đầu tiên. Câu hỏi quan trọng tiếp theo là: Làm thế nào để inject và sử dụng class đó hiệu quả?
Đọc thêm
Xây dựng menu đa cấp với ASP.NET Core MVC
Cách xây dựng menu đa cấp sử dụng đệ quy trong ASP.NET Core MVC
Đọc thêm
Tìm hiểu về ABP Framework, một framework mã nguồn mở trên .NET
ABP Framework là một framework hoàn chỉnh để xây dựng ứng dụng web hiện đại bằng cách áp dụng các best practice và tiêu chuẩn trong phát triển phần mềm.
Đọc thêm
Tìm lỗi ứng dụng ASP.NET Core trên Windows Server sử dụng stdout log
Một số lỗi trong lúc khởi động hệ thống ASP.NET Core trên Windows Server mà chúng ta chưa rõ nguyên nhân tại sao ứng dụng không hoạt động. Vậy bạn có thể dùng đểns stdout để chẩn đoán lỗi.
Đọc thêm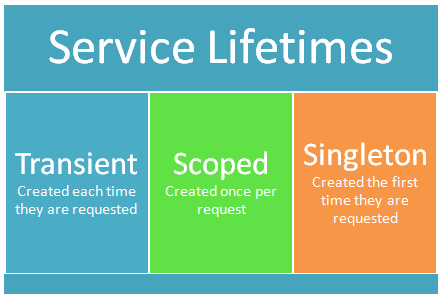
Vòng đời của Dependency Injection: Transient, Singleton và Scoped
Hiểu về vòng đời của các service được tạo sử dụng Dependency Injection là rất quan trọng trước khi sử dụng chúng.
Đọc thêm
Unobtrusive Client Validation trong ASP.NET Corre
Trong bài viết này chúng ta sẽ thực hiện validation phía client sử dụng Javascript.
Đọc thêm
Validation Tag Helper trong ASP.NET Core
ASP.NET cung cấp các tag helper liên quan đến hiển thị validation message cho người dùng.
Đọc thêm
Model Validation trong ASP.NET Core
Bài viết này chúng ta sẽ học về cơ chế Model Validation.
Đọc thêm
Cơ chế Model Binding: Truyền dữ liệu từ View lên Controller
Trong cơ chế Model Binding của ASP.NET Core chúng ta sẽ học cách làm sao để truyền dữ liệu từ View lên Controller.
Đọc thêm