Cài đặt và sử dụng ASP.NET Identity Core và Identity Server 4 trong ứng dụng ASP.NET Core

Việc quản lý thông tin đăng nhập, thông tin người dùng hay quyền rồi chứng thực là một phần không thể thiếu với bất cứ hệ thống nào. Các bạn sẽ phải làm đi làm lại nên trong bài viết này mình sẽ xây dựng một Identity Service sử dụng IdentityServer4 và ASP.NET Identity để giúp các bạn hiểu hơn về nó nhé.
Bất cứ ứng dụng hiện đại nào cũng chứa rất nhiều thành phần như: front-end app, back-end và các API tích hợp bên thứ 3. Vậy chúng ta cần phải triển khai việc chứng thực và cấp quyền (authentication và authorization) ra sao?
ASP.NET Core Identity là gì?
ASP.NET Core Identity là một thư viện quản lý việc chứng thực và cấp quyền được dùng cho mọi loại project từ MVC, WebForms cho đến WebAPI. Nó đáp ứng các nhu cầu chính như sau:
- Dễ dàng tùy chỉnh profile của user
- Lưu trữ thông tin user trong cơ sở dữ liệu sử dụng Entity Framework Code First.
- Hỗ trợ unit test
- Giới hạn quyền truy cập theo quyền
- Cung cấp cơ chế làm việc với claim
Nếu đã có ASP.NET Identity cho việc Authentication và Authorization thì tại sao lại cần IdentityServer4 nhỉ?
ASP.NET Identity có thể nhận một token bảo mật khi đăng nhập từ bên thứ 3 như Facebook, Google, Microsoft và Twitter. Nhưng nếu bạn muốn tự sinh ra mã token bảo mật cho các ứng dụng nội bộ của bạn giống như họ thì bạn cần phải có một thư viện của bên thứ 3 giống như IdentityServer4, OpenIddict.
Nếu làm một nghiên cứu nho nhỏ thì các bạn có thể thấy là IdentityServer4 rất phổ biến và hay được dùng để làm việc này.
Vậy IdentityServer4 là gì?
IdentityServer4 là một framework hỗ trợ OpenID Connect và OAuth 2.0 trên ASP.NET Core. Nó cũng là một gói thư viện trên Nuget được dùng trong ASP.NET Core như một middleware cho phép đăng nhập/đăng xuất, cấp token, chứng thực và các giáo thức chuẩn khác.
Để có cái nhìn tổng quan về kiến trúc của nó, các bạn có thể tham khảo thuật ngữ ở trang chủ của IdentityServer4:
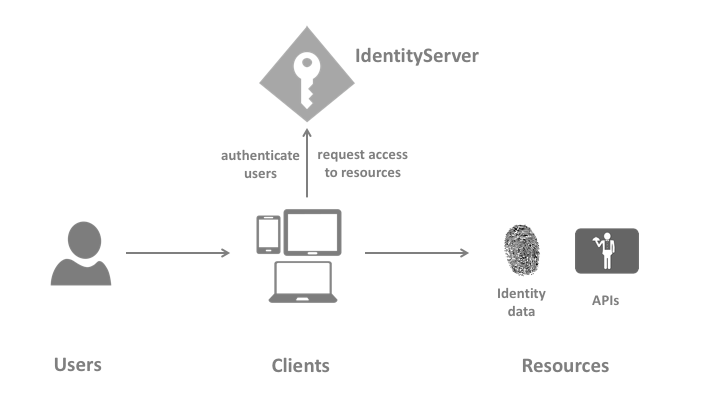
Nguồn: http://docs.identityserver.io/en/latest/intro/terminology.html
- User: là con người, là bạn hoặc tôi đang sử dụng một client.
- Client: là một phần mềm ứng dụng kiểu như trình duyệt web, mobile app hay bất cứ cái gì đang cần gọi một API resource.
- Resources: là các API bạn cần bảo vệ bởi IdentityServer4
- Access Token: nó là token được sử dụng để truy cập vào API Resource
- Refresh Token: mỗi một token đều có một thời gian hết hạn. Refresh token là việc lấy lại token mới mà không cần tương tác của người dùng. Client nên cho phép làm điều này bằng cách setup AllowOfflineAccess giá trị là true ở phần cài đặt client trong IdentityServer4.
- Grant Type: nó là loại tương tác giữa client và IdentityServer. Dựa trên client của bạn, có thể chọn loại grant type phù hợp.
Xây dựng Identity Service
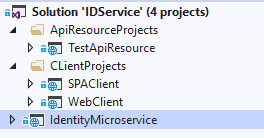
You can see the following steps in the IdentityServer4 docs for more details. The last output will be a visual studio 2019 solution that contains:
- IdentityMicroservice (IdentityServer4 và ASP.NET Identity)
- ClientsProjects\SPAClient (Ứng dụng client SPA kiểu như Angular, React)
- ClientsProjects\WebClient (Ứng dụng client dạng Web MVC)
- ApiResrouceProjects\TestApiResource (Là một API cần bảo vệ)
1- Identity Microservice Project Startup
Đây là project có trách nhiệm bảo v ệ API, cấu hình các client và lưu trữ thông tin user. Bạn có thể thấy mã nguồn trên GitHub.
Here are the steps:
Tạo mới một ứng dụng ASP.NET CORE Web Application (Empty).
Cài đặt IdentityServer4 Templates bằng cách thực thi lệnh sau:
dotnet new -i IdentityServer4.Templates
Thêm IdentityServer4 và QuickStart UI Files của nó (phần controller và view của Identity bao gồm đăng nhập, đăng ký…) với ASP.NET Identity Nuget packages vào project theo câu lệnh sau:
dotnet new is4aspid --force

Với .NET Core 3.1
Sau khi chạy lệnh trên, bạn hãy chắc chắn là chuyển Project từ .NET Core 3.0 lên .NET Core 3.1 và cập nhật IdentityServer4 Nuget Package từ 3.0 lên 3.1, bởi vì thực thi lệnh sẽ ảnh hưởng đến file .csproj và có thể sẽ downgrade phiên bản .NET Core trên IdentityServer4.Template.
Bạn sẽ cần cài thư viện Nuget packages:
"Microsoft.EntityFrameworkCore.Tools" Version="3.1.0"
Bạn cần bỏ đi “Microsoft.AspNetCore.App” nuget package bởi vì nó không cần trên .NET Core 3.1. Nó sẽ gây lỗi cho ApplicationDbContext và Startup.cs bởi vì nó thiếu các Nuget packages, bạn cần cài thêm:
- Microsoft.AspNetCore.Identity.EntityFrameworkCore 3.1.0
- Microsoft.AspNetCore.Diagnostics.EntityFrameworkCore 3.1.0
Bạn sẽ nhận warning message IHostingEnvironment bởi vì interface này được thay thế trong.NET Core 3.1 bởi IWebHostEnvironment.
Trong ConfigureServices() của Startup.cs thêm:
//services.AddMvc().SetCompatibilityVersion(Microsoft.AspNetCore.Mvc.CompatibilityVersion.Version_2_1);
services.AddControllersWithViews();
Trong Configure() của Startup.cs bạn cần điều hỉnh 1 chút:
app.UseRouting();
          // Block 4:
            //  UseIdentityServer include a call to UseAuthentication
            app.UseIdentityServer();
            app.UseAuthorization();

            //app.UseMvcWithDefaultRoute();
            app.UseEndpoints(endpoints =>
            {
                endpoints.MapControllerRoute(
                    name: "default",
                    pattern: "{controller=Home}/{action=Index}/{id?}");
            });
Sau đó build lại project và kiểm tra lại
2- Cấu hình Identity MicroService Project
2 file chính mà bạn cần chỉnh sửa:
- Config.cs
- Startup.cs
Định nghĩa thông tin client và resource
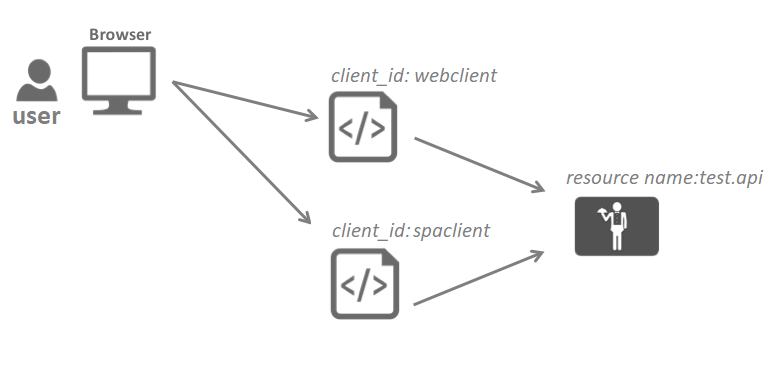
Nguồn: http://docs.identityserver.io/en/latest/intro/big_picture.html (modified version)
IdentityServer4 cho bạn 2 lựa chọn để cấu hình. Bạn có thể sử dụng cấu hình InMemory hoặc sử dụng database để lưu trữ. Trong ví dụ này mình sẽ dùng InMemory. Tức là danh sách client hoặc danh sách resource có thể tùy chọn thêm vào database của Identity Server hoặc luôn trong code InMemory. Trong database thì chúng ta sẽ dễ chỉnh sửa bổ sung hơn rồi đúng không nào?
Trong Config.cs file bạn sẽ định nghĩa danh sách API resources mà bạn muốn bảo vệ và danh sách các client mà bạn muốn cho phép truy cập vào resource. file này sẽ được dùng trong bước tiếp theo ở Startup.cs
Trong kịch bản thực tế của bạn, bạn nên sử dụng cấu hình dạng database. IdentityServer4 đã có hỗ trợ SQL Server sử dụng EntityFramework Core. Trong ví dụ này, Config.cs file sẽ như sau:
// Block 1: All APIs, I want to protect in my system
        public static IEnumerable GetApis()
        {
            return new ApiResource[]
            {
                new ApiResource("identity.api", "Identity API"),
                new ApiResource("test.api","Test API")
            };
        }

        public static IEnumerable GetClients()
        {
            return new[]
            {
                //Block 2:  MVC client using hybrid flow
                new Client
                {
                    ClientId = "webclient",
                    ClientName = "Web Client",
                    RequireConsent = false,
                    AllowedGrantTypes = GrantTypes.HybridAndClientCredentials,
                    ClientSecrets = { new Secret("49C1A7E1-0C79-4A89-A3D6-A37998FB86B0".Sha256()) },

                    RedirectUris = { "https://localhost:5002/signin-oidc" },
                    FrontChannelLogoutUri = "https://localhost:5002/signout-oidc",
                    PostLogoutRedirectUris = { "https://localhost:5002/signout-callback-oidc" },

                    AllowOfflineAccess = true,
                    AllowedScopes = { "openid", "profile", "identity.api","test.api" }
                },

                //Block 3: SPA client using Code flow
                new Client
                {
                    ClientId = "spaclient",
                    ClientName = "SPA Client",
                    ClientUri = "https://localhost:5003",
                    RequireConsent = false,
                    AllowedGrantTypes = GrantTypes.Code,
                    RequirePkce = true,
                    RequireClientSecret = false,
                    AllowAccessTokensViaBrowser = true,

                    RedirectUris =
                    {
                        "https://localhost:5003/index.html",
                        "https://localhost:5003/callback.html"
                    },

                    PostLogoutRedirectUris = { "https://localhost:5003/index.html" },
                    AllowedCorsOrigins = { "https://localhost:5003" },

                    AllowedScopes = { "openid", "profile", "identity.api" ,"test.api" }
                }
            };
        }
Thêm IdentityServer4 và Asp.NET Identity vào middleware
Startup.cs class được gọi khi ứng dụng chạy. Nó có 2 phương thức, ConfigureServices() sẽ đăng ký các service trong DI Container được dùng trong ứng dụng còn Configure() thì để cấu hình Request Pipeline:
public void ConfigureServices(IServiceCollection services)
        {
            //TODO: change UseSqlite to UseSqlServer
            services.AddDbContext(options =>            options.UseSqlite(Configuration.GetConnectionString("DefaultConnection")));
            // Block 1: Add ASP.NET Identity
            services.AddIdentity()
                .AddEntityFrameworkStores()
                .AddDefaultTokenProviders();

            // Block 2: Add IdentityServer4 with InMemory Configuration
            var builder = services.AddIdentityServer(options =>
            {
                options.Events.RaiseErrorEvents = true;
                options.Events.RaiseInformationEvents = true;
                options.Events.RaiseFailureEvents = true;
                options.Events.RaiseSuccessEvents = true;
            })
                .AddInMemoryIdentityResources(Config.GetIdentityResources())
                .AddInMemoryApiResources(Config.GetApis())
                .AddInMemoryClients(Config.GetClients())
                .AddAspNetIdentity();
//some code is not mentioend here for the sake of brevity
            services.AddAuthentication();
        }

        public void Configure(IApplicationBuilder app)
        {
            if (Environment.EnvironmentName == "Development")
            {
                app.UseDeveloperExceptionPage();
                app.UseDatabaseErrorPage();
            }
            else
            {
                app.UseExceptionHandler("/Home/Error");
            }

            app.UseStaticFiles();
            app.UseRouting();
            // Block 4:
            //  UseIdentityServer include a call to UseAuthentication
            app.UseIdentityServer();
            app.UseAuthorization();

            //app.UseMvcWithDefaultRoute();
            app.UseEndpoints(endpoints =>
            {
                endpoints.MapControllerRoute(
                    name: "default",
                    pattern: "{controller=Home}/{action=Index}/{id?}");
            });
        }
Sau khi cấu hình Identity service project, hãy chuyển sang cấu hình API và Clients
3- Configuring Web Client Project
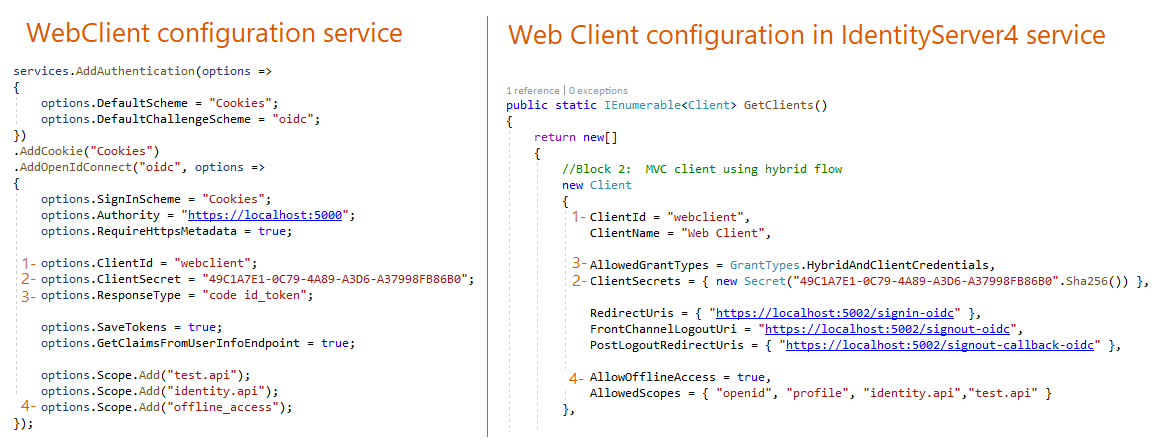
Như bạn thấy bên trái của ảnh trên bạn có thể cấu hình sử dụng OpenIdConnect bằng việc cung cấp thông tin client đã được lưu trong IdentityService.
Link chứng thực là một link public của IdentityService. Grant type là hybrid nó là trình bày cả hay flow ngầm định và cơ chế xác thực quyền. Nó được khuyến nghị grant type cho ứng dụng web phía server và mobile ap.
4 - Cấu hình Single Page Application Project

SPA là ứng dụng client bạn phải cài đặt thư viện Javascript OpenIdConnect sau đó thêm nó vào trang HTML.
Grant Type là authorization-code với PKCE. Chi tiết tại đây
5- Cấu hình Test API Resource Project
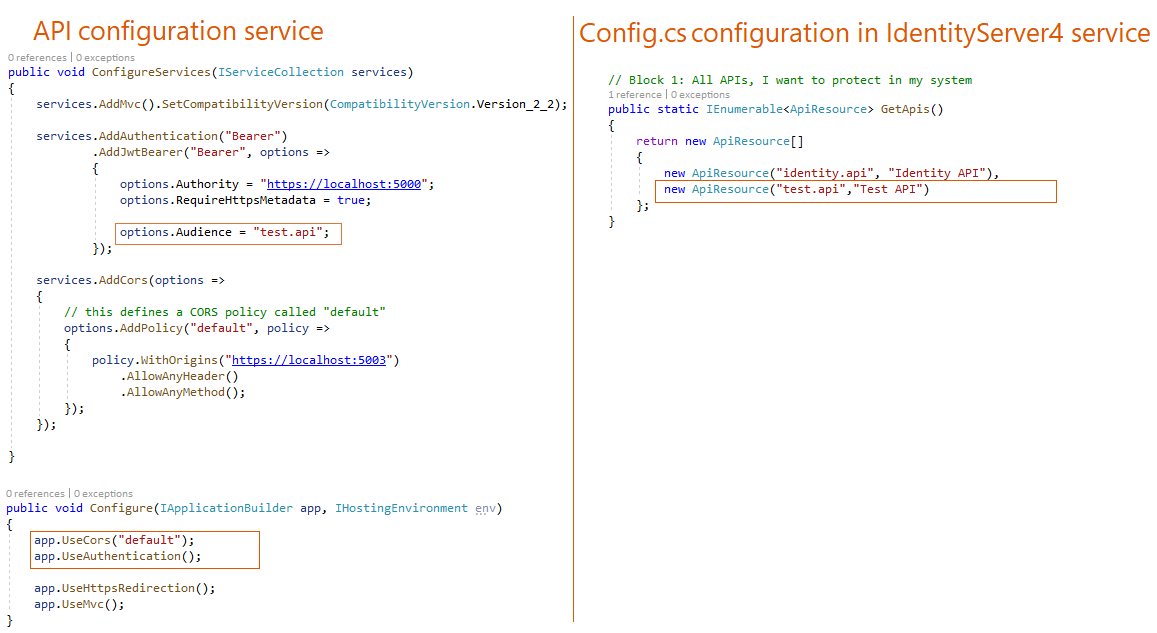
Ở bên phải, tôi định nghĩa một API Resource trong IdentityServer4 bằng một tên duy nhất và một label.
Bên trái là tôi thêm thông tin chứng thực vào API Resource Startup class. Sau đó tôi bật tính năng CORS để cho phép các client có thể gọi đến API.
Trong phương thức Configure(), tôi sử dụng cấu hình Auth và CORS "default" được định nghĩa từ trước. (Chú ý sử dụng cấu hình authentication trong request pipeline trước MVC)
Chạy toàn bộ ứng dụng
Để chạy nhiều project một lúc trong Visual Studio bạn cần vào Solution’s Properties > Common Properties > Startup Project
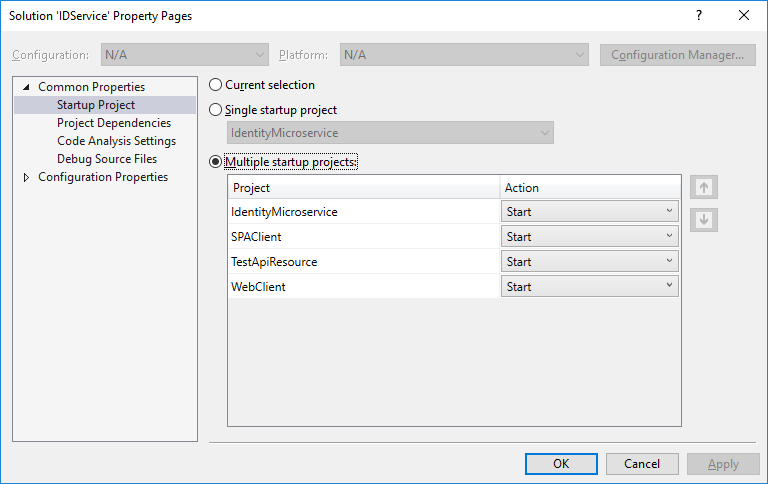
Tốt hơn hết nên để IdentityMicroservice lên chạy đầu tiên.
Khi bạn clone repo code, bạn sẽ thấy file lauchSettings.json trong mỗi project. File này thường bị bỏ qua và khong include vào repo.
Tôi đã thêm launchsettings.json và sử dụng cổng tương tự như trong Config.cs file. Các cổng đó là:
- Identity Microservice ở port 5000
- Test Api Resource ở port 5001
- Web Client ở port 5002
- SPA Client ở port 5003
Giờ bạn có thể chạy solution, bạn có thể dùng test user được tạo trong file SeedData.cs vào SQLite database để sử dụng lưu trưc user data.
Trích nguồn từ: https://feras.blog/how-to-use-asp-net-identity-and-identityserver4-in-your-solution/
Tags:
Bài viết liên quan
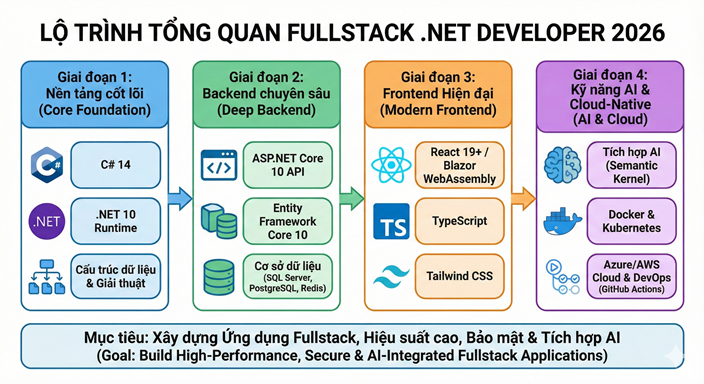
Lộ trình Fullstack .NET Developer 2026
Chào bạn, bước sang năm 2026, lộ trình của một Fullstack .NET Developer đã có những thay đổi quan trọng để thích nghi với sự lên ngôi của AI, điện toán đám mây và phiên bản .NET 10 (LTS) vừa ra mắt cuối năm 2025.
Đọc thêm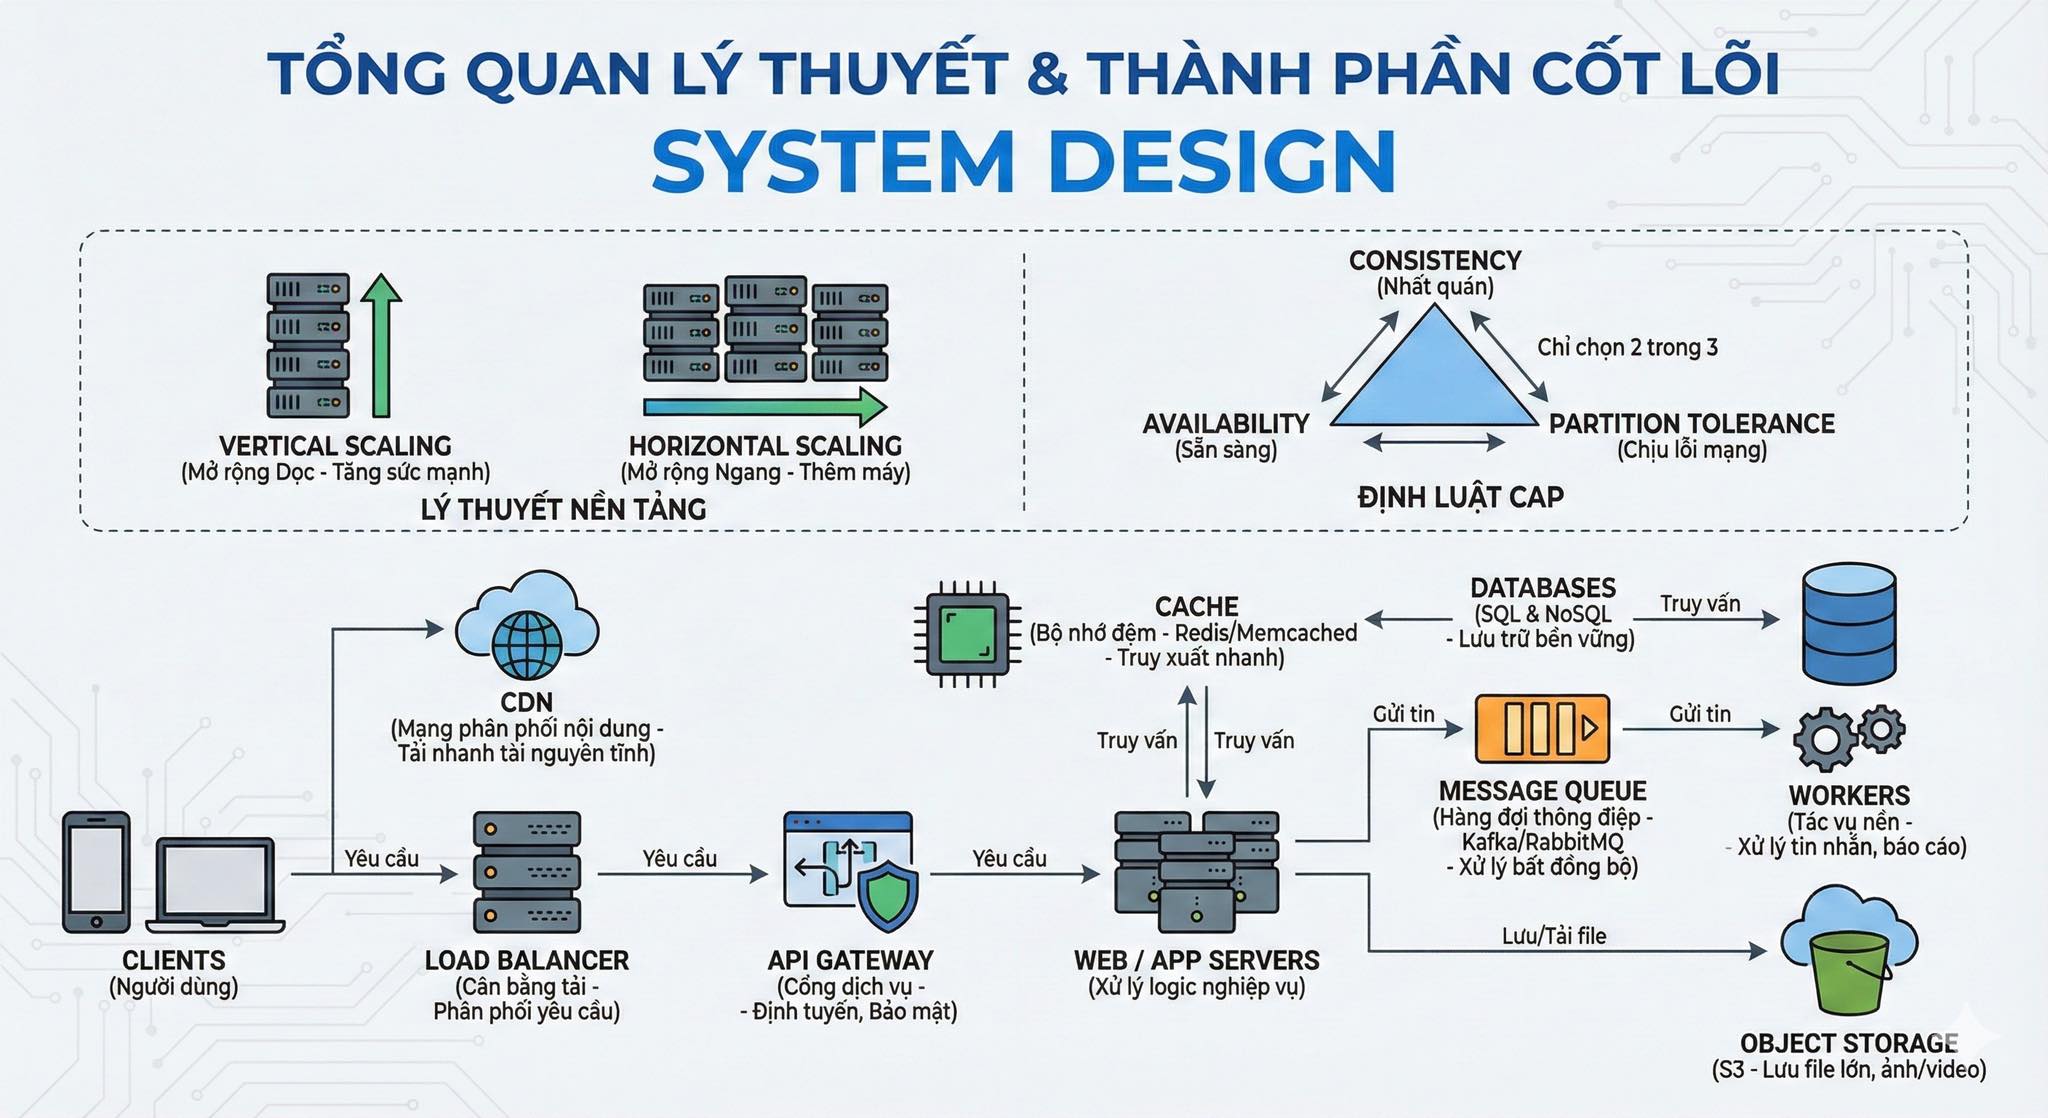
TỔNG QUAN LÝ THUYẾT & THÀNH PHẦN CỐT LÕI SYSTEM DESIGN
Các lý thuyết cốt lõi trong System Design
Đọc thêm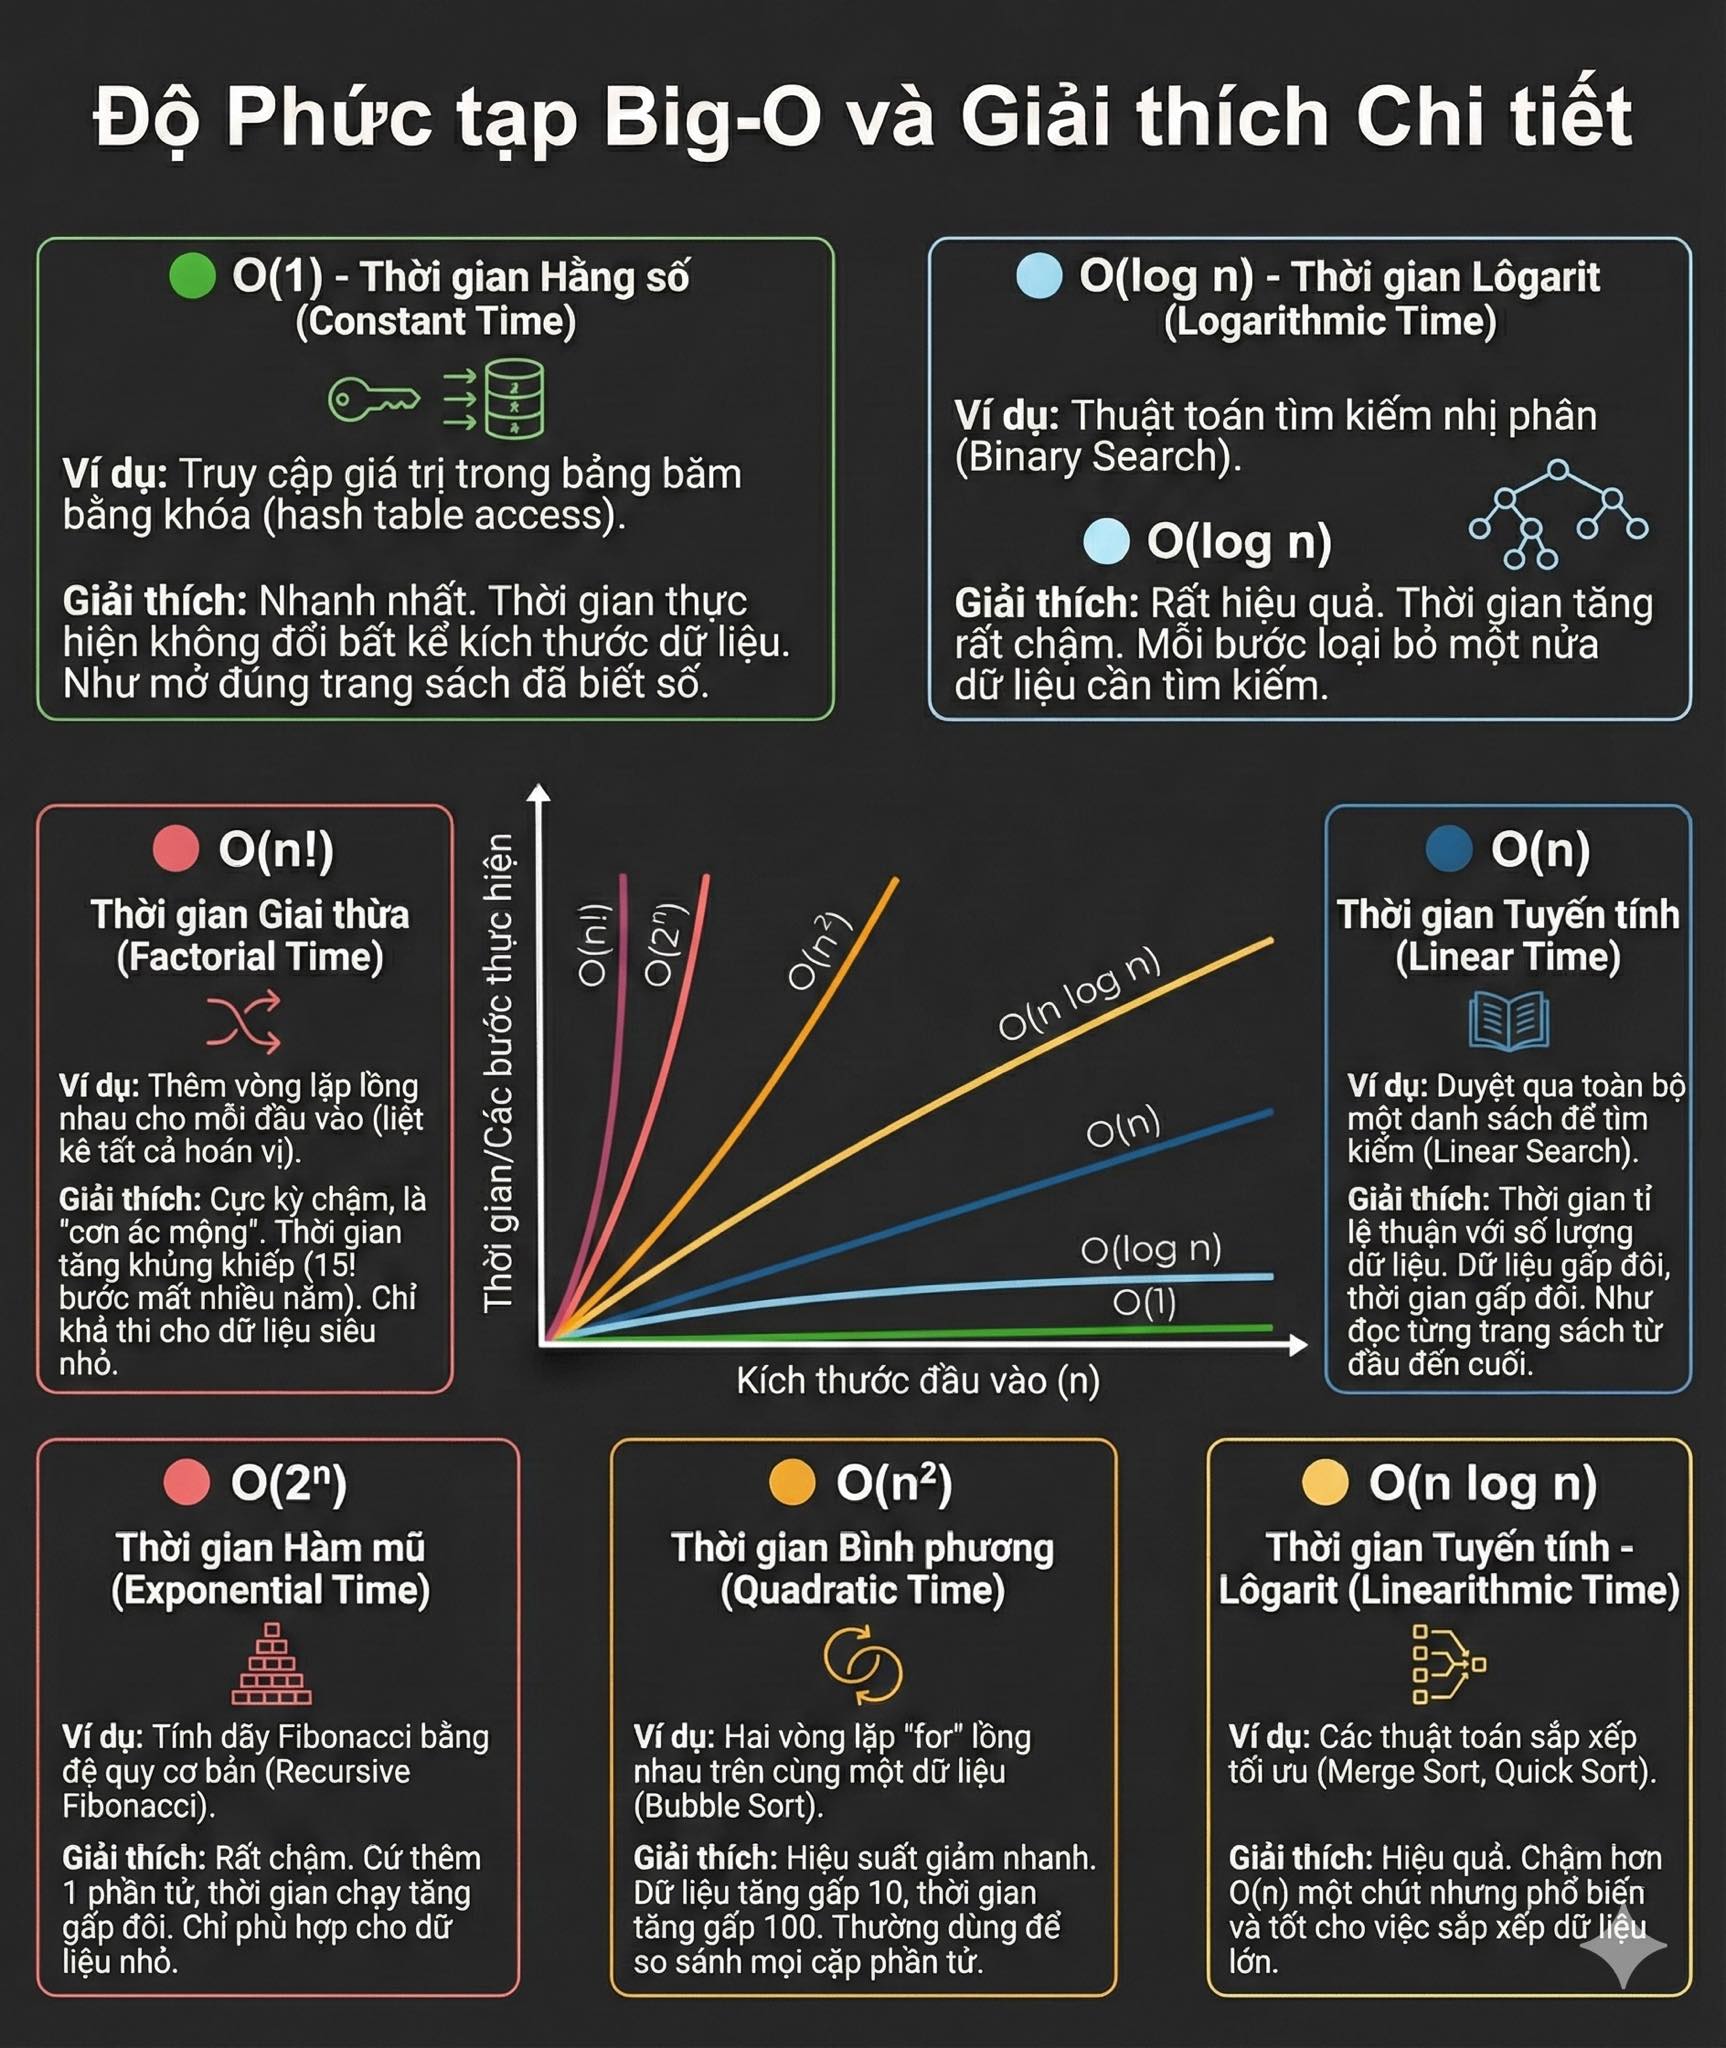
Cẩm nang Big-O: Thước đo hiệu năng thuật toán trong C#
Hiểu rõ Big-O từ O(1) đến O(n!) qua ví dụ C# thuần. Bí quyết tối ưu code, chọn đúng cấu trúc dữ liệu để hệ thống luôn chạy nhanh và ổn định.
Đọc thêm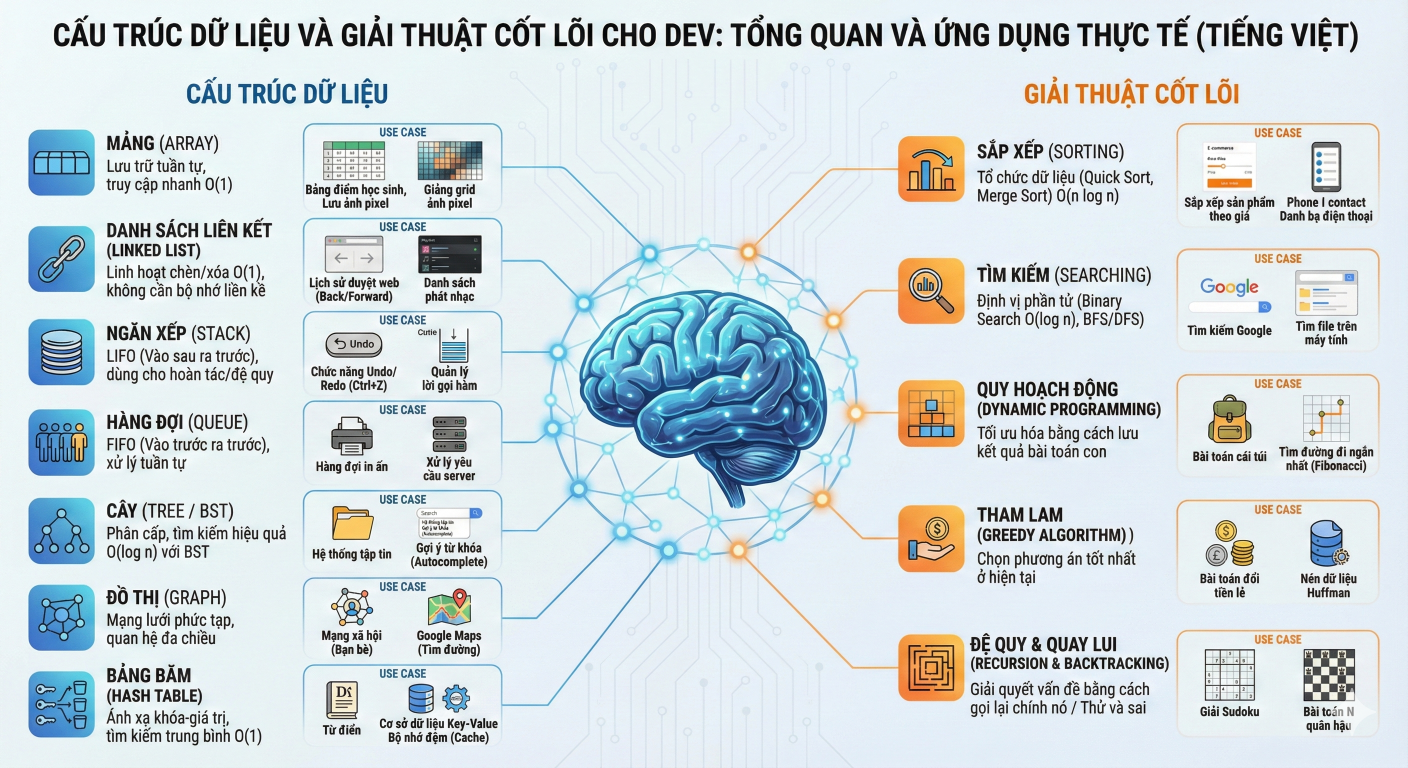
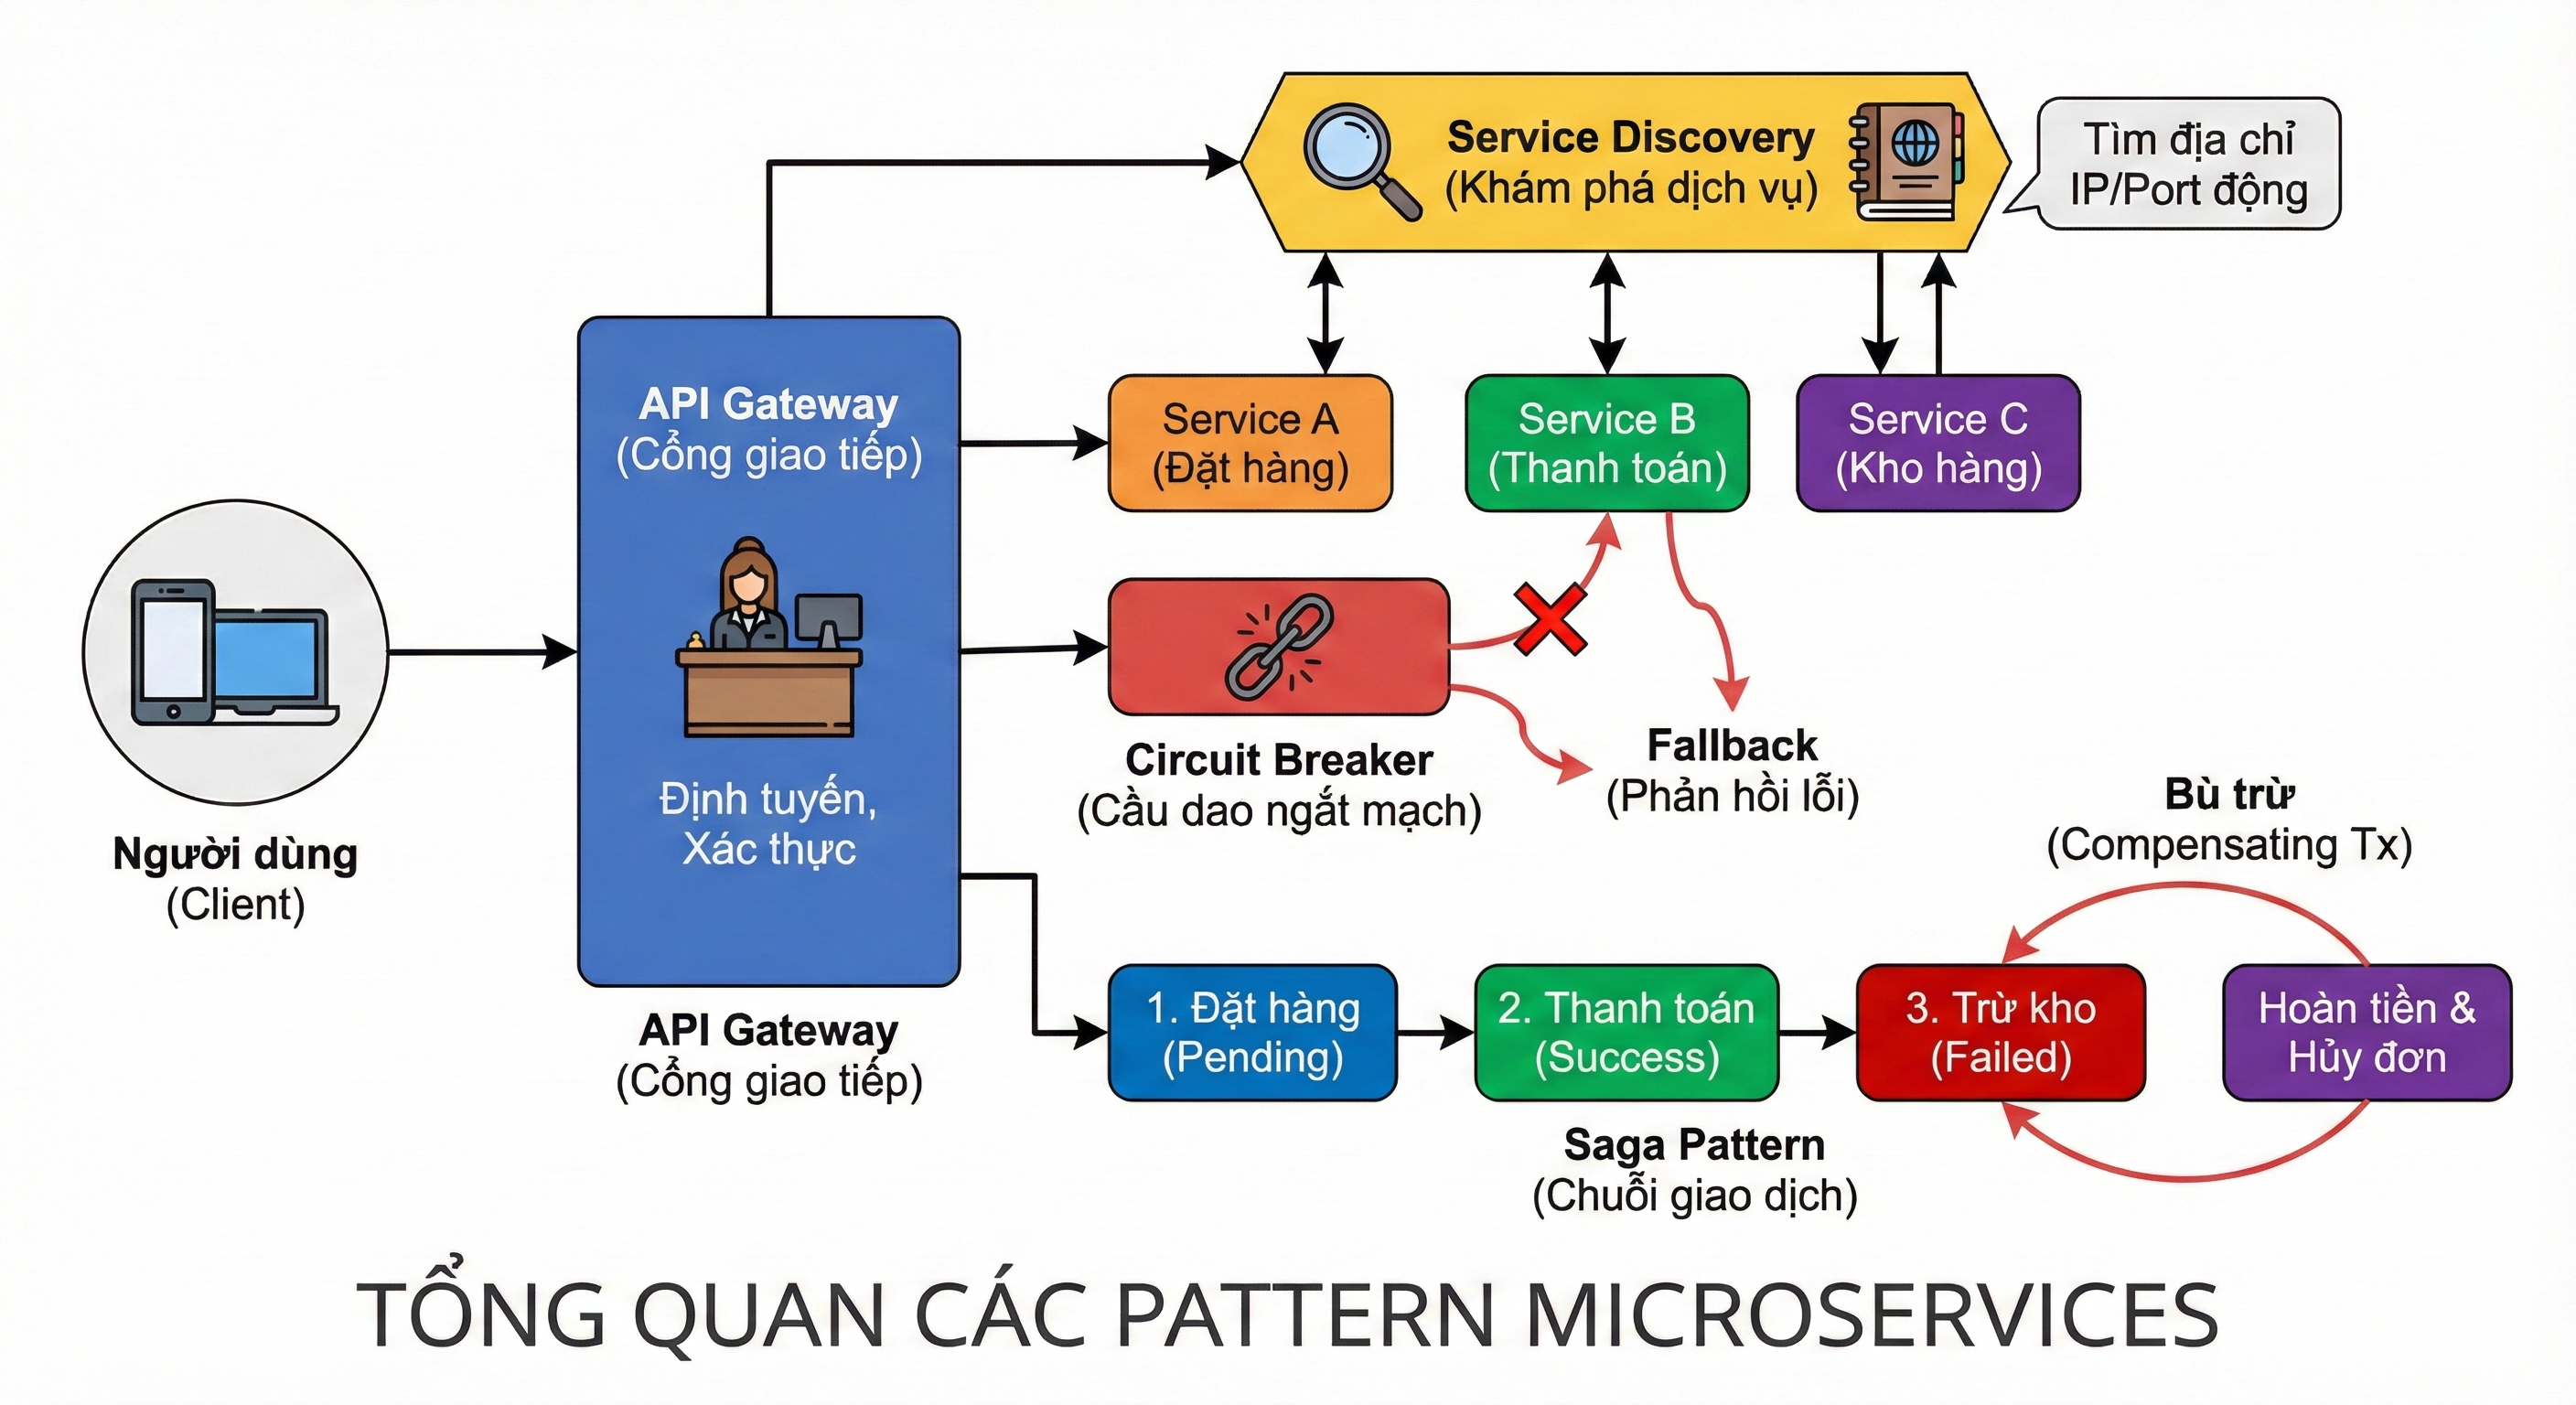
Các mẫu thiết kế (design patterns) phổ biến trong kiến trúc Microservices.
Các mẫu thiết kế (design patterns) phổ biến trong kiến trúc Microservices.
Đọc thêm
Hướng dẫn Bind Jenkins vào IIS trên Windows bằng Reverse Proxy
Cho phép truy cập Jenkins từ một subdomain (ví dụ jenkins.tedu.com.vn) thay vì phải gõ http://localhost:8080.
Đọc thêm
Hiểu về AI, LLM, RAG và Agentic RAG trong 15 phút
Trong vài năm gần đây, trí tuệ nhân tạo (AI) đã bùng nổ mạnh mẽ và trở thành tâm điểm của cả thế giới công nghệ. Nhưng đi kèm với nó là hàng loạt khái niệm mới như LLM, RAG, hay Agentic RAG khiến nhiều người mới bắt đầu cảm thấy lúng túng.
Đọc thêm
Hướng dẫn tự triển khai N8N trên CentOS bằng Docker Compose và NGINX
N8N là công cụ mã nguồn mở cho phép bạn tự động hóa quy trình làm việc (workflow automation) và tích hợp nhiều dịch vụ khác nhau mà không cần phải lập trình.
Đọc thêm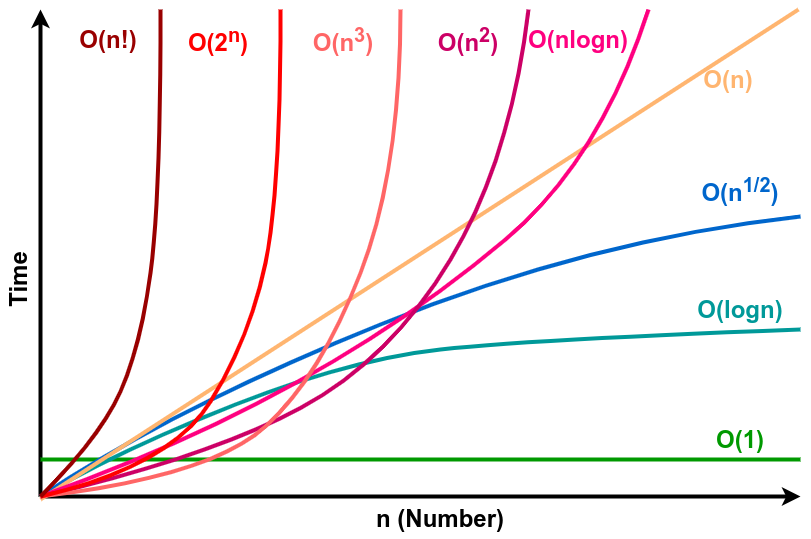
Hướng dẫn phân tích độ phức tạp thuật toán chi tiết
Độ phức tạp của giải thuật là một cách để đánh giá hiệu quả của một giải thuật dựa trên hai yếu tố chính là độ phức tạp thời gian và độ phức tạp không gian.
Đọc thêm
Bài 6. Các thao tác với XPath và Selector trong Selenium
Bài viết này hướng dẫn bạn làm việc XPath và Css Selector trong Selenium.
Đọc thêm