Hướng dẫn tích hợp Angular 2 CLI với SignalR để hiển thị thông báo realtime
Bài viết này mình sẽ hướng dẫn các bạn sử dụng SignalR với Web API, một thư viện hỗ trợ realtime của .NET tích hợp với ứng dụng Angular 2 ở front end để tạo chức năng thông báo real time.
Phần backend Web API
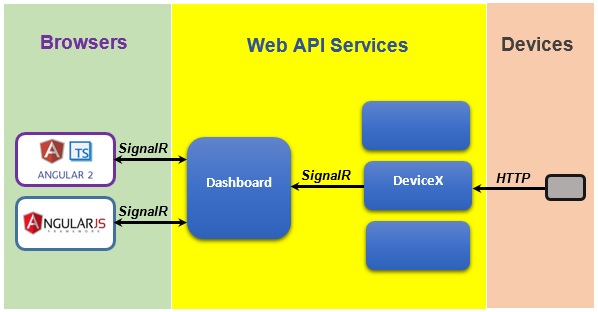
Mô hình WebAPI chúng ta sử dụng chứng thực OAuth với Token Base và kết hợp với ASP.NET Identity. Ứng dụng của chúng ta sẽ giao tiếp mô hình như sau:

Bước 1: Các bạn phải các bạn cài đặt các thư viện ở Nuget:
  <package id="Microsoft.AspNet.SignalR" version="2.1.2" targetFramework="net45" />
  <package id="Microsoft.AspNet.SignalR.Client" version="2.2.2" targetFramework="net45" />
  <package id="Microsoft.AspNet.SignalR.Core" version="2.2.2" targetFramework="net45" />
  <package id="Microsoft.AspNet.SignalR.JS" version="2.1.2" targetFramework="net45" />
  <package id="Microsoft.AspNet.SignalR.Owin" version="1.2.2" targetFramework="net45" />
  <package id="Microsoft.AspNet.SignalR.SystemWeb" version="2.1.2" targetFramework="net45" />
Ngoài ra còn có Cross Origin để cho phép các ứng dụng client khác domain có thể truy cập được:
<package id="Microsoft.AspNet.Cors" version="5.2.3" targetFramework="net45" />
Bước 2: Bật tính năng SignalR lên trong Startup.cs:
Chúng ta có thể chọn chế độ bật mặc định để bật lên hoặc chứa configuration:
app.MapSignalR();
Hoặc chứa configuration chi tiết:
// Branch the pipeline here for requests that start with "/signalr"
            app.Map("/signalr", map =>
            {
                // Setup the CORS middleware to run before SignalR.
                // By default this will allow all origins. You can
                // configure the set of origins and/or http verbs by
                // providing a cors options with a different policy.
                map.UseCors(CorsOptions.AllowAll);

                map.UseOAuthBearerAuthentication(new OAuthBearerAuthenticationOptions()
                {
                    Provider = new QueryStringOAuthBearerProvider()
                });

                var hubConfiguration = new HubConfiguration
                {
                    // You can enable JSONP by uncommenting line below.
                    // JSONP requests are insecure but some older browsers (and some
                    // versions of IE) require JSONP to work cross domain
                    EnableJSONP = true,
                    EnableDetailedErrors = true
                };
                // Run the SignalR pipeline. We're not using MapSignalR
                // since this branch already runs under the "/signalr"
                // path.
                map.RunSignalR(hubConfiguration);
            });
Provider các bạn nhìn thấy trong cấu hình trên là dùng để lấy tham số token từ client gán vào signalR Hub để chứng thực người dùng:
 public class QueryStringOAuthBearerProvider : OAuthBearerAuthenticationProvider
    {
        public override Task RequestToken(OAuthRequestTokenContext context)
        {
            var value = context.Request.Query.Get("access_token");

            if (!string.IsNullOrEmpty(value))
            {
                context.Token = value;
            }

            return Task.FromResult<object>(null);
        }
    }
Bước 3: Để làm việc client thì Server sẽ chìa ra một Hub để giao tiếp. Giờ chúng ta sẽ tạo hub trong thư mục SignalR của Web. Luồng dữ liệu sẽ là khi có thay đổi ở server thì server sẽ thông qua một hub để push một sự kiện về client thông qua các connection id để định danh client. Method name của nó sẽ là addAnnouncement(message). Đây là method name mà client sẽ nhận được sự kiện thông qua proxy của nó.
Khi client kết nối nó sẽ luôn lắng nghe, một khi có sự kiện từ server trả về nó sẽ phát sinh dưới client và xử lý thông tin.
namespace TeduShop.Web.SignalR
{
    [Authorize]
    public class TeduShopHub : Hub
    {
        private readonly static ConnectionMapping<string> _connections =
            new ConnectionMapping<string>();


        public static void PushToAllUsers(AnnouncementViewModel message, TeduShopHub hub)
        {
            IHubConnectionContext<dynamic> clients = GetClients(hub);
            clients.All.addAnnouncement(message);
        }
        /// <summary>
        /// Push to a specific user
        /// </summary>
        /// <param name="who"></param>
        /// <param name="message"></param>
        public static void PushToUser(string who, AnnouncementViewModel message, TeduShopHub hub)
        {
            IHubConnectionContext<dynamic> clients = GetClients(hub);
            foreach (var connectionId in _connections.GetConnections(who))
            {
                clients.Client(connectionId).addChatMessage(message);
            }
        }

        /// <summary>
        /// Push to list users
        /// </summary>
        /// <param name="who"></param>
        /// <param name="message"></param>
        public static void PushToUsers(string[] whos, AnnouncementViewModel message, TeduShopHub hub)
        {
            IHubConnectionContext<dynamic> clients = GetClients(hub);
            for (int i = 0; i < whos.Length; i++)
            {
                var who = whos[i];
                foreach (var connectionId in _connections.GetConnections(who))
                {
                    clients.Client(connectionId).addChatMessage(message);
                }
            }

        }
        private static IHubConnectionContext<dynamic> GetClients(TeduShopHub teduShopHub)
        {
            if (teduShopHub == null)
                return GlobalHost.ConnectionManager.GetHubContext<TeduShopHub>().Clients;
            else
                return teduShopHub.Clients;
        }

        /// <summary>
        /// Connect user to hub
        /// </summary>
        /// <returns></returns>
        public override Task OnConnected()
        {
            _connections.Add(Context.User.Identity.Name, Context.ConnectionId);

            return base.OnConnected();
        }

        public override Task OnDisconnected(bool stopCalled)
        {
            _connections.Remove(Context.User.Identity.Name, Context.ConnectionId);

            return base.OnDisconnected(stopCalled);
        }

        public override Task OnReconnected()
        {
            if (!_connections.GetConnections(Context.User.Identity.Name).Contains(Context.ConnectionId))
            {
                _connections.Add(Context.User.Identity.Name, Context.ConnectionId);
            }

            return base.OnReconnected();
        }

    }
}
Trong class trên chúng ta có một static connection mapping để map giữa 1 connection id và 1 user name. Mỗi một user khi login vào hệ thống thì sẽ được tự động connect đến hub và được cấp một connection id tự động. SignalR không quan tâm đến user nó chỉ quan tâm là có những connection nào được connect đến hub là nó sẽ thông báo liên lạc qua connection đó. Bản chất bên dưới là một socket id. Nên trong sự kiện OnConnected chúng ta sẽ map user hiện tại với connection id của nó. Để với 3 hàm PushToAllUsers, PushToUser và PushToUsers chúng ta biết là push thông báo cho user nào ngoại trừ push cho toàn bộ user.
Đây là class ConnectionMapping:
public class ConnectionMapping<T>
    {
        private readonly Dictionary<T, HashSet<string>> _connections =
            new Dictionary<T, HashSet<string>>();

        public int Count
        {
            get
            {
                return _connections.Count;
            }
        }

        public void Add(T key, string connectionId)
        {
            lock (_connections)
            {
                HashSet<string> connections;
                if (!_connections.TryGetValue(key, out connections))
                {
                    connections = new HashSet<string>();
                    _connections.Add(key, connections);
                }

                lock (connections)
                {
                    connections.Add(connectionId);
                }
            }
        }

        public IEnumerable<string> GetConnections(T key)
        {
            HashSet<string> connections;
            if (_connections.TryGetValue(key, out connections))
            {
                return connections;
            }

            return Enumerable.Empty<string>();
        }

        public void Remove(T key, string connectionId)
        {
            lock (_connections)
            {
                HashSet<string> connections;
                if (!_connections.TryGetValue(key, out connections))
                {
                    return;
                }

                lock (connections)
                {
                    connections.Remove(connectionId);

                    if (connections.Count == 0)
                    {
                        _connections.Remove(key);
                    }
                }
            }
        }
    }
Mã nguồn hoàn chỉnh của Web API của mình đã được phát triển, giải thích trong khóa học Làm dự án thực tế với Angular 2 + Web API.
Phần frontend Angular 2
Bước 1: Chúng ta cài đặt signalR cho client: npm install signalr
Bước 2: Chúng ta nhúng file: "../node_modules/signalr/jquery.signalr.js", vào ứng dụng, với Angular CLI là file angular-cli.json
Bước 3: Tạo SignalR service cho Angular 2:
import { Injectable, EventEmitter } from '@angular/core';
import { SystemConstants } from './../common/system.constants';
import { AuthenService } from './authen.service';
@Injectable()
export class SignalrService {

  // Declare the variables
  private proxy: any;
  private proxyName: string = 'teduShopHub';
  private connection: any;
  // create the Event Emitter
  public announcementReceived: EventEmitter<any>;

  public connectionEstablished: EventEmitter<Boolean>;
  public connectionExists: Boolean;

  constructor(private _authenService: AuthenService) {
    // Constructor initialization
    this.connectionEstablished = new EventEmitter<Boolean>();
    this.announcementReceived = new EventEmitter<any>();
    this.connectionExists = false;
    // create hub connection
    this.connection = $.hubConnection(SystemConstants.BASE_API);
    this.connection.qs = { "access_token": _authenService.getLoggedInUser().access_token };
    // create new proxy as name already given in top
    this.proxy = this.connection.createHubProxy(this.proxyName);
    // register on server events
    this.registerOnServerEvents();
    // call the connecion start method to start the connection to send and receive events.
    this.startConnection();
  }
  // check in the browser console for either signalr connected or not
  private startConnection(): void {
    this.connection.start().done((data: any) => {
      console.log('Now connected ' + data.transport.name + ', connection ID= ' + data.id);
      this.connectionEstablished.emit(true);
      this.connectionExists = true;
    }).fail((error: any) => {
      console.log('Could not connect ' + error);
      this.connectionEstablished.emit(false);
    });
  }

  private registerOnServerEvents(): void {
    this.proxy.on('addAnnouncement', (announcement: any) => {
      this.announcementReceived.emit(announcement);
    });
  }
}
Trong đó hub name chính là tên class Hub ở server ở đây mình đặt là TeduHub. Trong constructor chúng ta sẽ khởi tạo connection và method startConnection dùng để kết nối đến server. Phương thức registerOnServerEvents() dùng để đăng ký các sự kiện để lắng nghe ở server, ở đây là sự kiện addAnnouncement, ngoài ra chúng ta có thể đăng ký thêm nhiều sự kiện khác. Khi có thông báo từ server trả về sẽ xuất ra một đối tượng thông báo lên thuộc tính announcementReceived để đưa ra ngoài service.
Bước 4: Chúng ta lấy thông báo ra ngoài component và hiển thị:
 public canSendMessage: Boolean;
  public announcements: any[];
  constructor(
    private _signalRService: SignalrService) {
    // this can subscribe for events
    this.subscribeToEvents();
    // this can check for conenction exist or not.
    this.canSendMessage = _signalRService.connectionExists;
  }

  ngOnInit() {
    this.loadAnnouncements();
  }

  private subscribeToEvents(): void {

    var self = this;
    self.announcements = [];

    // if connection exists it can call of method.
    this._signalRService.connectionEstablished.subscribe(() => {
      this.canSendMessage = true;
    });

    // finally our service method to call when response received from server event and transfer response to some variable to be shwon on the browser.
    this._signalRService.announcementReceived.subscribe((announcement: any) => {
      this._ngZone.run(() => {
        console.log(announcement);
        moment.locale('vi');
        announcement.CreatedDate = moment(announcement.CreatedDate).fromNow();
        self.announcements.push(announcement);
      });
    });
  }


  private loadAnnouncements() {
    this._dataService.get('/api/Announcement/getTopMyAnnouncement').subscribe((response: any) => {
      this.announcements = [];
       moment.locale('vi');
      for (let item of response) {
        item.CreatedDate = moment(item.CreatedDate).fromNow();
        this.announcements.push(item);
      }

    });
  }
Và đây là thành quả:

Bài viết liên quan

Tổng quan kiến trúc Angular và các khái niệm
Biết xem framework làm việc ra sao là rất quan trọng trước khi bạn bắt đầu sử dụng nó. Bài viết này sẽ đi qua các thành phần quan trọng của Angular.
Đọc thêm
Giới thiệu về Angular
Chào mừng bạn đến với series bài viết hướng dẫn Angular. Series này bao gồm từ Angular 2, 3, 4, 5, 6, 7, 8 và 9. Bao gồm các bước để bắt đầu làm chủ Angular
Đọc thêm
Angular 8.0 – Có gì mới? Cách nâng cấp ra sao?
Chúng ta đều biết Google vừa ra mắt phiên bản mới của Angular 8.0. Các nhà phát triển Angular và cộng đồng đã đợi bản update này từ lâu
Đọc thêm
Angular 2 căn bản - Bài 15: Xây dựng Form từ template
Bài học này chúng ta sẽ học cách xây dựng form với Template trong Angular 2.
Đọc thêm
Angular 2 căn bản - Bài 14: Cách tạo và sử dụng Pipes
Bài học này chúng ta sẽ học cách sử dụng các Pipe có sẵn trong Angular 2 để định dạng và chuyển đổi dữ liệu hiển thị, đồng thời học cách tạo mới các custom pipe theo nhu cầu nghiệp vụ riêng.
Đọc thêm
Angular 2 căn bản - Bài 13. Sự Tương tác giữa các component
Bài này chúng ta sẽ học về @Input, @Ouput và @ViewChild trong Angular 2. Giúp tương tác qua lại giữa các component
Đọc thêm
Angular 2 căn bản - Bài 12: Attribute Directives
Bài này chúng ta sẽ học 2 buit-in directive trong Angular 2 là ngClass và ngStyle nằm trong loại directive thứ 2 là Attribute Directive.
Đọc thêm
Angular 2 căn bản - Bài 11: Stuctural directives
Bài này chúng ta sẽ tìm hiểu cách sử dụng của 3 build in directive là ngIf, ngFor và ngSwitch
Đọc thêm
Angular 2 căn bản - Bài 10: Two way binding
Tìm hiểu cơ chế hoạt động của Two way - binding trong Angular 2 và sự khác nhau giữa Angular 1 và 2. Đây là tính năng rất quan trọng và thường sử dụng khi bạn làm việc với Angular
Đọc thêm
Angular 2 căn bản - Bài 9: Event binding
Cách binding sự kiện trong Angular 2
Đọc thêm